The Book About the Body and the Instrument
1. Introduction
Being on stage
To be on stage performing music for an enthusiastic audience can be pleasurable, fantastic, challenging and demanding, but can also often become an uncomfortable and nerve-wracking experience, after which it can be almost impossible to understand how you were able to get from start to finish. Preparation begins much earlier, in the practice room, and it is there that good habits are formed. To feel comfortable, safe and relaxed in the actual performance situation is crucial to then be able to focus on the music itself and give your all when you need.
Ergonomics for Musicians
This document has come into being as reference material to find guidance for the changes needed regarding various injuries. In different educational circumstances, the need is great for reference material with specific information on ergonomics to be used as a basis for the teaching of various instruments. Since making music requires your entire being to be actively engaged, both physically and psychologically, this document also discusses thought patterns and emotions. It includes a review of basic ergonomics as well as ergonomic advice for specific instruments, to be used as a basis for discussion about how to engage the body in a more healthy way in a physiological perspective. We would like to take this opportunity to thank all the professional musicians and educators who have helped us in the development of this work.
We cannot ignore the effect of stress on the body. At times stress can be particularly evident, and it can be difficult to handle the high level of tension in the muscles. A common theme running through these pages is the need to increase knowledge regarding improved self-care. Here you will find advice about various types of preparatory exercises. Physical training is necessary in order to handle an active life as a musician.
2. Basic Ergonomics
The function of the body during the execution of music performance
What is it that holds your instrument up making it possible to perform music?
We begin with a commonplace term – Ergonomics – which encompasses an incredibly broad area, from how we handle our work and its ambient factors mentally, treatment by superiors, area of activity, demands and recovery, to factors of the physical environment, such as light, seating, ventilation, work-surface height, to how we act physically in terms of muscle structure and how we engage and adapt our bodies in various activity-based work positions. To begin with, we will focus on the body and how it can be used in the best way possible in order to facilitate making music. There are many ways to move and also to play an instrument. The goal is to achieve a soft and smooth pattern of movement. To make things manageable and comprehensible, we will look at different parts of the body separately. However, it is important to acknowledge that in reality all parts are connected and one affects the other, and for this reason it is important to see the bigger picture, even if it is initially presented in parts.
Another thing to think about when talking about the body is that we all have different degrees of physical awareness. Some people feel clearly what is happening in the body, aware of the slightest changes, while others have a considerably more basic awareness. This means that it is usually good to seek help from a physiotherapist or another physical therapist to get feedback and guidance about what is happening in the body. Moreover, whenever we try something new or change something that has been habitual for a long time, the body will protest by sending us more information from the altered region, sending signals about increasing tension, pulling, aching or general discomfort. This is completely natural since the body is alive and needs time to adapt its structures to new positions. A problem that often arises is that the person in question feels that it is too uncomfortable, and he or she interprets this as “this can’t be good for me”. Alternatively, the change can demand so much concentration and attention that he or she does not believe it is worth the effort. In general, we can say that after having learned something new, it takes two to three weeks before we can master it, on the condition that we practise it daily. It can take even longer for an action to become automatic.
The body has an amazing ability to adapt itself to what it is subjected to. In respect to our normal sitting and standing positions, we are often “tricked” into thinking that everything feels as normal. However, such awareness does not always mean that this is the best position for the activity we are carrying out at that exact moment. For this reason it is good to occasionally question our normal positions in order to find the optimal position for each given activity. The information and advice below about how our bodies can be adapted to function optimally can at first seem somewhat tedious and time-consuming, but after a while each stage progresses more quickly, developing physical recognition and self-awareness, so that eventually a single thought can be enough for a correction to occur automatically.
Anatomy of the body
We are all constructed on the same concept. We have a skeleton consisting of bones of various sizes and dimensions. The skeleton has joints at strategic points to facilitate movement. For movement to occur, there must be musculature arranged on the skeleton, upon which almost every muscle passes over a joint so movement can occur. The musculature, in turn, is able to function due to the circulatory system that provides it, and every other structure in the body, with energy as well as removing residue and waste. For this to function, breathing is very important. In part, the musculature functions via our large and complex network of nerves. Nerves send out signals to the muscles about what is to happen as well as sending information inwards about what is happening out in the body. These systems collaborate with each other in order for an activity or movement to occur.
The whole of this process is, of course, well known to everyone, to a lesser or greater degree. The question is rather how aware we are about how we use our bodies in different situations and activities, and if we know what is best for us.
Performance often involves an increased strain on certain joints and muscles. At times, playing involves using a joint’s extreme/outer position. If a joint is used in its outer position for a long time, which can, for example, cause the two joint surfaces to “gnaw” at each other, it can cause pain in the joint itself. Pain is also often caused by the overexertion of muscles, muscular attachments or tendons.
In whatever way we choose to arrange the position of our joints, the body can perform movements. However, there are positions where joints, tendons and musculature function optimally and most gently. Each joint in the body has an optimal neutral/medium position with regards to the musculature that is to perform the work, i.e. both to stabilise the respective joint and to perform balanced, smooth movements. Whichever position we adopt, and whichever is most appropriate to use, depends on how long we are to stay in that position and how much power and/or endurance we wish to achieve.
Exercise to examine the significance of the joint position for stress on the muscles.
Try this:
1. Let the arm, forearm and hand/fingers hang freely beside the body and pretend to play your instrument with your fingers.
2. If you now continue to let the arm hang beside the body but angle the hand up as far as possible and then try to play with your fingers again, you will probably feel a difference.
3. Now you can also try to clench your hand and stretch the wrist as far as possible, as if you are gripping something. Now try to play again and compare the feeling in the muscles.
Structure of the skeleton
The spinal column is the frame of our torso, and the pelvis, hips, knees and feet support, in turn, the whole spinal column and the head. Our various muscles are attached to the spinal column, and we use these when we stand, sit and when we make music. There are, of course, muscles around the spinal column that stabilise and support it, and, as such, it is also these muscles that alter our position and actively decide our posture. The position of the spinal column depends entirely on the position adopted by the pelvis, hips, knees and feet. As you play, your arms need to be able to be relaxed, supported by the stabilising muscles around and in the shoulders. The muscles that stabilise the shoulder blade itself have great significance for how the arms are supported, and thus how they function. The work of these stabilising muscles is, in turn, completely dependent on how the shoulder blades rest on the rib cage. The posture of the rib cage, and thus the spinal column, is crucial for the position of the shoulder blades. The hips and the pelvis need to be held in a stable neutral position. Each person must find his or her own optimal position as an individual.


Both when we are sitting and when we are standing, we can consciously use our skeleton and see this as a basis for supporting ourselves to begin with, and then also to support our instruments or tools or whatever we are holding. The better we prepare ourselves and make ourselves aware of our skeleton, the less strain we will place on our muscles. If the skeleton is in a functional position, we will also use our postural musculature optimally. The postural musculature is suited to being able to function for a long time, to lie close to joints, and to actively assist other musculature systems (superficial and more peripheral musculature) when concentrating on, for example, handling an instrument. In order to achieve and find this upright reflex/posture we must also think about where stress and weight settles in the body. The ideal situation for the structures of the body is for weight to be placed as centrally as possible in the joints, no matter which joint is in question. Then the body’s structures have the possibility to function in the most effective position in which they have stamina, move smoothly and can develop the most power. This position facilitates collaboration between muscles around the joint so that there is a constant alternation of tension, relaxation, tension, relaxation, and not only the muscles of one side working constantly with the muscles on the other side being stretched. Agonist and antagonist assist one another.
To be aware of where centres of mass arise in the body is, therefore, another element we should know about and pay attention to. This happens quite well of its own accord if we have a suitable structure in our bodies. In general it can be said that we tend to place our centre of gravity too high up in the body. If we can move this lower down in the body, often somewhere between the navel and the pelvis, this allows musculature to be more in harmony and relaxed, as well as our stability improving radically. In addition to the skeleton and musculature, we also need to make ourselves aware of our breathing. If our breathing can spread out and feel deep and calm, this results in a more relaxed musculature. Breathing can help to lower the centre of gravity, make us calm and relaxed, and achieve smoothness, flow and harmony in our movements.
Harmony pertaining to movement and functionality does not only come from awareness and knowledge of physicality about how the body is adapted, but rather more about experiencing, feeling and strengthening physical awareness and experience. This is a never-ending process, which should continue throughout our lives, in constant change. Harmony in the body can be achieved when there is balance between the skeleton, musculature, breathing and mental challenges, and for this we need to be aware and attentive to a certain degree. This will provide you with an exciting quest and wonderful experiences throughout your whole life.
Illustration 1 - five different postures
How can I become physically aware in order to avoid dysfunction, and maintain harmony and functionality?
We will take the structure of the body step by step, working our way upwards with the physical parts of the body, skeleton and muscles.
The foot when standing
When standing, the foot is the only contact we have with the ground, and that contact is not particularly great. The foot is also the part that the whole body rests on, and it is important to use the soles of our feet optimally. The foot is constructed with an arch that allows flexibility and elasticity, which is conveyed further upwards in the body to achieve an easy gait. We employ this elasticity most often when we walk, but when we are standing still there is a risk that we might not use it fully. Elasticity/suspension is important for our circulation and breathing to function optimally, as well as for stamina in the whole body’s musculature. The musculature in the foot helps primarily to maintain the foot arch.
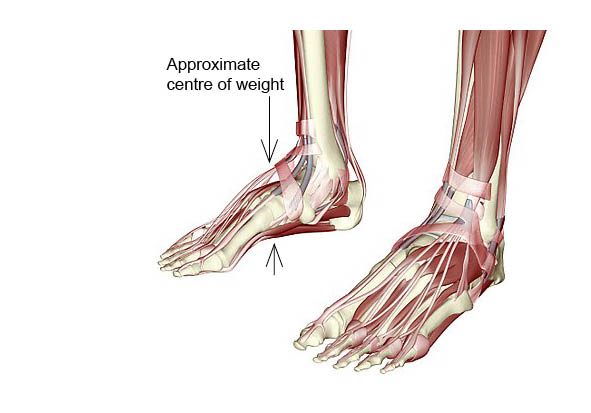
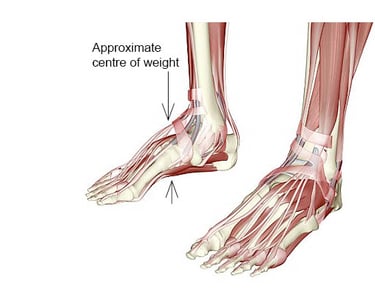
Illustration 2 – construction and centre of balance of the foot
When standing still we should try to get the centre of balance to be as central as possible in each foot so that we can use the elasticity along both the length and breadth of the foot arch in the best way. What often happens when we are standing is that weight tends to rest on the heel. We have no elasticity in the heel, only a pad of fat and then the heel bone, so that area is relatively rigid. For example, when landing after a jump, we should not land on the heel. If we do land on the heel it will be sore and it will also result in discomfort further up in the lumbar spine. Even when we are standing still and, of course, do not have the same weight on the foot as when jumping, we are affected if the elasticity in the foot is not optimal. For this reason we should aim to have the weight in the middle of the foot so that we can access this elasticity. Furthermore, we will have more stability when the weight is in the middle, rather than when it is on the heel. If we stand with the weight on the heel, we will tend to lean backwards with decreased balance, and the centre of balance will rise. The same thing happens if we have the weight too far forward on the foot. This has repercussions on the level of tension in the thigh, stomach and neck musculature, which in turn can negatively affect the breathing, and if you play a wind instrument or are a singer, this directly affects your sound and stamina.
The weight on the foot should be in the middle of the triangle formed by the little toe, the big toe and the front part of the heel.
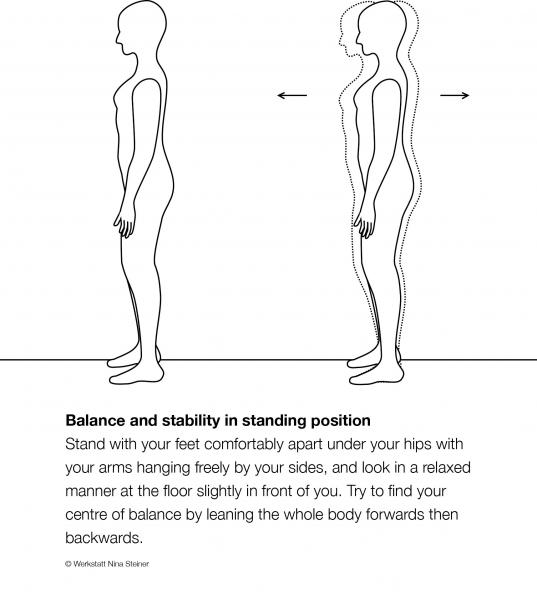
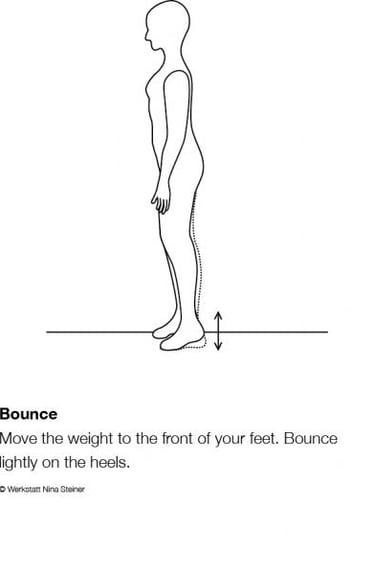
To find the weight and balance on the foot, try the exercises below.
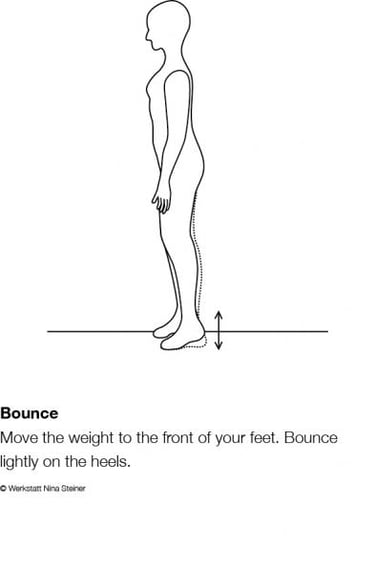
Illustration of bounce and swing. Exercise 1

The knees in standing position
As everything in the body is connected, and one thing affects the other, our next stop is the knees. Exactly as in the foot, there is also an optimal position regarding cushioning and elasticity for the knees. The system here is not as complex as in the foot, nor is it comprised of so many small joints. Rather, it is a case of a single joint, and actually the largest joint in the body, which is, therefore, constructed to handle considerable weight. All joints have cartilage, which protects the surfaces of the joint, as well as being important for weight distribution and offering specific cushioning. The cartilage is thickest in the middle of the joint, and it is thus here, as centrally as possible, that we should position weight and stress. The starting point is again standing still, and if we continue up from the feet to the knees, then it is not unusual, if the weight is on the heel, for the risk of overstretching (bending back) of the knee to be increased. This is not the case for everyone, as we are all affected by our genetic inheritance, and certain people have a greater overflexibility than others, while yet others cannot overextend their joints at all. Notice that overflexibility in the knee can occur even if the weight is centred on the foot. If the knee is overextended, the weight will land on the front part of the knee joint, and here the articular cartilage is thinner and, as such, less resistant. Try, then, to let the knee joint be in a position where it is given room for some flexibility when you are standing still, so you are able to swing with the knees. Try the above exercise (Exercise 1) by overstretching your knee and then bending lightly, and notice if you experience any difference in terms of balance, breathing, flexibility, and centre of mass. Maintain the position where there is an openness and “oiliness” in the knees, and balance on the foot.
Now, when the balance lies in the middle of the foot, there is openness for the extension of elasticity through the knees. We will now, therefore, move on the next section, which is the pelvis in standing position.
The pelvis in standing position
The pelvis unites the lower body with the upper body. The legs are fastened via the hip joints to the pelvis (the hip joint is situated approximately in the groin), and the spine then wedges itself down between the two halves of the pelvis at the back – the SI (sacroiliac) joint.


Illustration 3 – hip joint, pelvis, SI joint, etc.
We can tilt the pelvis forwards and backwards, and we can also move it in a circular, “hula hoop” movement. The position of the joints below, i.e. the ankle joint and knee joint, is also important for the pelvis in order to achieve optimal functionality (still in respect to standing position). If the knee joint is overstretched, it becomes heavier and more difficult to tilt and rotate the pelvis. Feel free to try this. Yet again, the efficiency of the structures around the pelvis is hampered, and the weight is focussed unfavourably, and the position prevents elasticity from continuing up into the body. When the knees are stretched too greatly, the pelvis often tilts forward, that is, the curvature in the back becomes greater. An increase in this curvature results in more pressure around the SI joint, and the spinous processes in the spine are pulled down against one another. The weight then falls more on these processes than the vertebral bodies themselves. Another position that can result in similar problems is when the hip joint locks. This occurs when the pelvis is pushed forward and involves, in general, the hip joint not being used for movement, and the weight through the joints then comes more from the back than from above (see Illustration 1). This is often seen in bass guitar and double bass players. The instrument rests against the hip and pelvis and unconsciously pushes the pelvis forward, pressing it against the instrument, and the hip locks. To achieve good support and elasticity via the pelvis, try to tilt it as far forwards as possible, that is, bend as much as you can, and then bend in the other direction, pulling the coccyx between the legs. Put one hand on the curve of the back and the other slightly below the navel and feel how the pelvis moves when you tilt it forwards and backwards. Stop somewhere in the middle between your outer positions and feel the flexibility, and that it is possible to move the pelvis in small, free movements.
The spine in standing position
As has already been mentioned, the position of the pelvis is important for where weight rests in the spine, i.e. more on the spinous processes or on the vertebral bodies. The spinous processes, which stretch out both to the sides from the vertebrae and also straight back, form a construction of articular surfaces that make various twisting, bending and stretching movements in our back possible. The muscles for these movements have very long muscle fibres between several vertebrae and short muscle fibres that stretch between single vertebrae and other areas in the back. When breathing, these muscles are active and one can notice a little movement, particularly in the transition between the lumbar spine and the pelvis. For the sake of our breathing, for its elasticity, and to avoid incorrect weight distribution, or trapped or slipped disks, the weight in the back should rest more between the vertebral bodies than on the spinous processes. The vertebral bodies also have joints between each other with cartilage; however, there are also disks here, fibrous tissue that helps to distribute pressure and weight as well as offering cushioning.
The spine’s curvature helps our mobility and absorbs weight in the back. In the lower part of the spine there is a curve; the back bends in towards the stomach, and then, in the thoracic spine, it bends in the opposite direction – a kyphosis. There is then another curve in the neck, a bend inwards. This curvature varies somewhat from person to person. It can also be increased, or alternatively decreased, due to incorrect functional positioning, disharmony in the musculature, illness, etc.

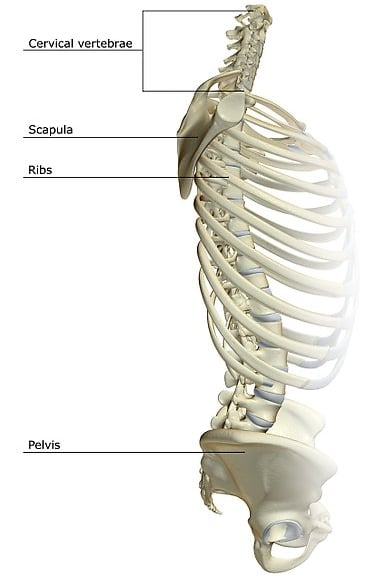
Illustration 5 – the spine and the rib cage
How the pelvis is tilted affects both the mobility of the vertebrae in the lower part of the back and the extent of the curve of the back. The position of the pelvis also affects the upper part of the spine, but that part, the thoracic spine, can also be affected by how we angle the breastbone. If we allow the breastbone to sink into the body, then the upper part of the back will become more rounded, the kyphosis increases and the shoulders slide forward, as does the head. We become, in general, somewhat heavy at the front. We hang more forwards in the spine, and the weight is not transferred straight through the spine via the vertebral bodies. Instead, the vertebral bodies are overburdened at the front, and the spinous processes are pulled apart. The distribution of weight is not optimal (see Illustration1).
If instead we actively push the breastbone forward, as though puffing out the chest, some of the kyphosis in the thoracic spine disappears, the curve in the lower part may increase, and the shoulders go back followed by the head, resulting in increased muscle tension over the larynx. Much of the musculature around shoulder blades and down the back is used for this position, the spinous processes become closer to each other and weight is distributed more through the back part of the spine than through the vertebral bodies. Breathing tightens and it becomes difficult for elasticity to reach upwards. One can even feel what happens with the whole rib cage, not only the breastbone – it angles forwards and then backwards. For the spine, then, there are two points we should be more conscious of. Firstly, the position of the pelvis is important for what happens, for the most part, in the lower back, and secondly, the position of the rib cage and the breastbone is important for what occurs at the top of the back and in the shoulders and neck. The most functional and optimal position for us is to find a middle position for these two different areas where one can rest upon the other instead of sliding away from each other.
Try now to discover the mobility that is possible in these two different levels in the back separately, and notice what happens depending on the position regarding breathing, balance, muscle activity, flexibility and stability. Then try to place one on top of the other and notice your stability and free breathing.
The shoulder blades in standing position
The shoulder blades form an ingenious construction that facilitates the great mobility we have in the shoulders. The extension of the shoulder blades upwards also constitutes the top of the joint for the condyle in the shoulder. The shoulder blade constitutes an important attachment of the whole shoulder joint to the rib cage, and has an important balancing function for movement of the shoulder joint and arm.
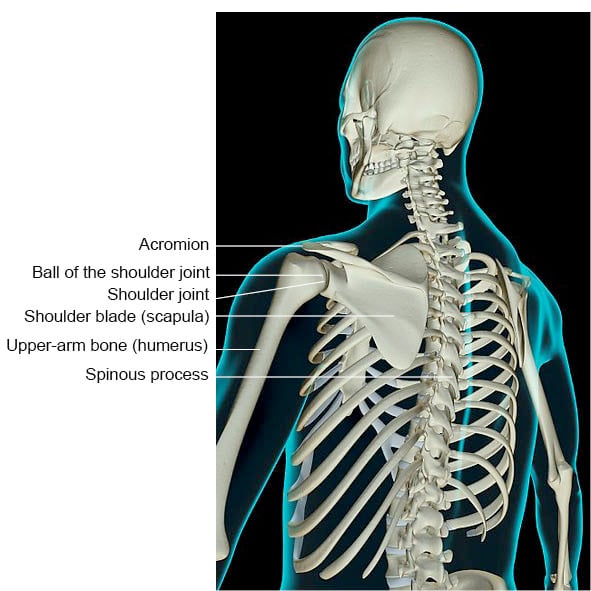
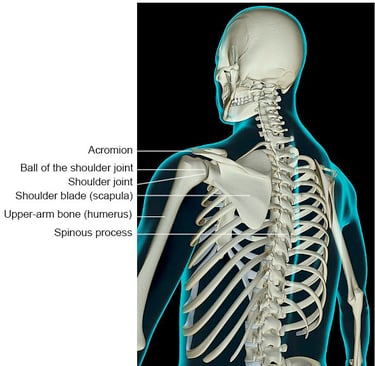
Illustration 6 – shoulder and shoulder joint
On and around the shoulder blade there are several muscles, and these help to keep the shoulder joints in a functional position. The shoulder blades and shoulders work closely together with each other. Feel what happens with the shoulders and shoulder blades when the thoracic spine is curved. The shoulders fall forwards and the shoulder blades slip out from the spine. Straighten the thoracic spine again, put one hand between the shoulder blades and locate the inner edge of the shoulder blade. Rotate the other arm forwards, outwards, upwards and then back, and feel how the shoulder blade follows depending on the movement.
In addition to helping the shoulder joints, the shoulder blade also supports and reinforces the whole arm. The better the position of the shoulder blade, and thus the support it offers, the more free the peripheral musculature out in the arm and hand will be to deal with the instrument. However, this depends on the shoulder blade finding the correct position. Due to its pliability, and also the fact that, for the most part, only muscles stabilise both the shoulder blades and the shoulder joint, an imbalance can easily arise in and around the shoulders. When problems arise in the hand and the arm, the problem and the source of the trouble often reside farther up in the shoulder or the shoulder blade. This usually depends, in part, on the position we have adopted in respect to the back and the pelvis, and partly due to the upper part of the trapezius muscle being too dominant, thus pulling the shoulder blade up and forcing the shoulder joints to slide forwards/upwards. This position carries the risk of pinching the structures around the shoulder joints (see the shoulder section).
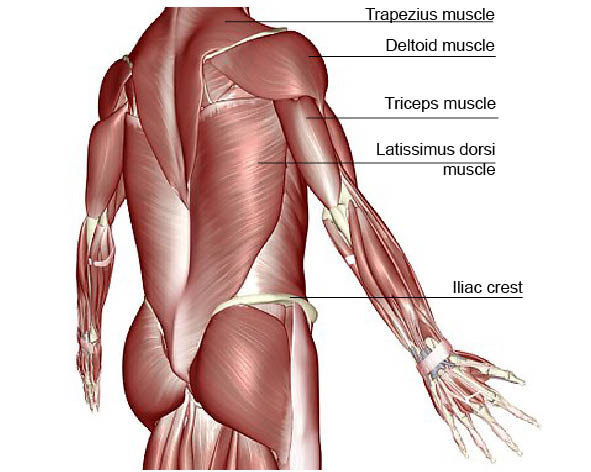

Illustration 7 – musculature of the back and shoulders
In order to be able to harness the great potential of the shoulders for movement and their ability to hold the arms, and thus instruments, we need muscles that can stabilise and balance these movements. Muscles often constitute working pairs influencing the same direction of movement. At the same time there are always muscles that, in each specific movement, have the opposite function, in order for the movement to be smooth and even. There are always several muscle groups in action at the same time, and it is when one of these muscles takes over the function and works more independently or in a more extended position that overstraining and pain can develop.
An important starting point in the function of the shoulders is that the shoulder blade, which stabilises movements, actually works in a stable manner, and has muscles that make sure it moves in close contact with its foundation, the rib cage. In particular, the muscle that stabilises the lower part of the shoulder blade – the serratus anterior muscle – has an important function. There are several muscles that also help to stabilise the shoulder blades – the trapezius, rhomboid and levator scapulae muscles. All of these are important components and, above all, it is the balance between their different degrees of activity that is crucial.
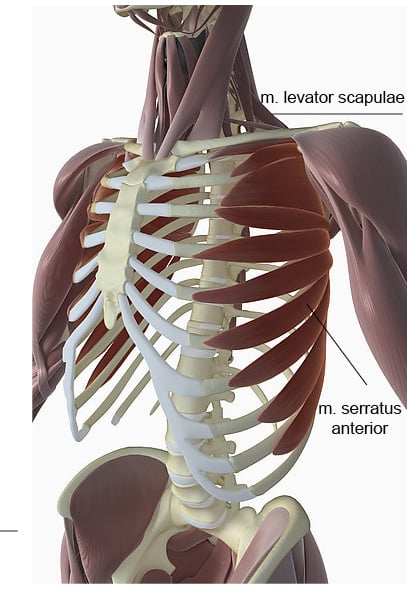
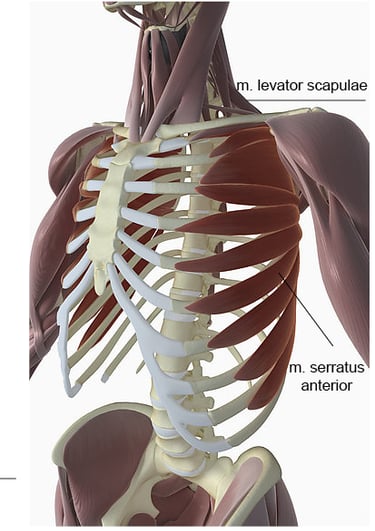
Illustration 8 – serratus anterior, etc.
It is possible to see from the position of the shoulders how adequate the balance is. When strain is put on muscles and movements are performed, it becomes clear whether there is an imbalance. If the shoulders are drawn back excessively, this often means that the muscles on the rear side of the shoulders are more active. The most usual case, however, is that the shoulders are drawn more towards the front, which results in the thoracic spine shrinking and the shoulder blades losing some contact with the rib cage. We then usually compensate by pushing forward the chin, and as a consequence there is an increase in curvature in the cervical spine.
Often the muscles between the shoulder blades (rhomboid muscles), the muscles that hold down the shoulder blade (for example, the lower part of the trapezius, and pectoralis minor) and the muscles that hold the shoulder blade close to the rib cage (serratus anterior, latissimus dorsi) need to be developed. Ideally this should be done under the supervision of a physiotherapist so that any existing imbalance does not continue to be developed. Since the musician holds his or her instrument in front of the body, and thus has the arms lifted to a lesser or greater degree, the shoulder blade often finds itself in a position where it is moving away from the spine. In this case, the muscles at the back will be used mostly in stretched positions, and the front muscles are more often pulled together. If the position of the shoulder and shoulder joint are not in balance, then the structures have to deal with more strain. For this reason, it is important as a musician to exercise the shoulder musculature and the musculature around the shoulder joints.
When you have an instrument that requires you to hold it up with your arms at all times, it is important for the shoulders and the arms to be supported by the skeleton and the supporting muscles. Here the posture and the position of the spinal column and the shoulder blades are crucial. It is important to be able to use the arms with a feeling of ease, working organically with the rest of the body, and to be able to vary the level of activity with the breathing, so that the muscles are able to vary their tension and function.
As a way to stabilise the shoulder blade and activate the musculature, particularly in the lower part of the shoulder blade try the exercis below:
First, try to hold the arms out in front of the body and feel the sensations of weight, support and stability in the arms. Then adopt the position below and see if you notice any difference in terms of support and stability for the arms when you lift them up in front of you again.
Exercise 2
• Sit or stand in a stable position. Let your arms fall to your sides and then rotate the arms out from the shoulder blades so that the thumbs point outwards and the palms forwards. Maintain this outward rotation during the whole movement.
• Curve the thoracic spine at the same time as you lift the shoulders forwards and up towards the ears and breathe out. Stay in this “ear position”.
• Find and adopt the medium position for the thoracic spine through inhalation. The activity comes from inside.
• Then let the shoulders sink slowly, and consciously try to feel that the musculature around the lower part of the shoulder blades is still active when the shoulders are down and the arms are again in the neutral position.
The shoulder in standing position
The shoulder joints with their surrounding muscles are the most normal place for problems for musicians. The arms are held up primarily by the musculature of the shoulders, and weight is then transferred to the whole skeleton. From the age of 40 onwards, the sensitive structures in the shoulder joints themselves become more clearly affected. Pain can also arise in several of the muscles around the shoulder joints themselves.
The shoulder joints have a very flat joint cavity and must rely primarily on the musculature in the joint cavity itself and around the shoulder and the shoulder blade to keep the joint centred. The shoulder joints consist of the condyle, which press against a frontal sinus, which only covers around 30% of the condyle. This is to allow a wide range of movement. The joint-capsule is thin and offers little stability. The ball of the joint is stabilised by tight bands of tendons; however, this is not enough, so the stabilising ability of the musculature is important. There is also a “ceiling” in this joint cavity – the acromion. This ceiling is a protruding part of the shoulder blade itself (see Illustration 6). The muscles that are located the farthest in, and which are attached to the condyle, form the rotator cuff musculature, consisting of the supraspinatus muscle, the infraspinatus muscle, the teres minor muscle and the subscapularis muscle. These muscles affect how the condyle orients itself with its various enclosing surfaces as it moves in different directions – outwards and upwards, and inwards and downwards. For example, when the arm moves upwards to shoulder level, the ball of the joint in the shoulder goes against the “ceiling” (acromion), the hard, flat part that is situated farthest out on the upper side of the shoulder. In this movement, the muscle tendons and other parts (nerves, ligaments and vessels) are pinched together. Nature has solved this by making the structures that pass through that area bend away, stretching themselves a little to make this pressing together possible, as long as the joint is centred. If not, there is an increased risk that these structures can become pinched. The rotator cuff’s muscle tendons that attach to the ball of the shoulder joint can become pressed in if the muscles outside the ball of the shoulder joint itself do not provide a good balancing function. If the outer muscles do not give enough stability, the condyle can then come too close to the very top of the bone and cause mechanical pressure and friction on these tendons, resulting in inflammation.
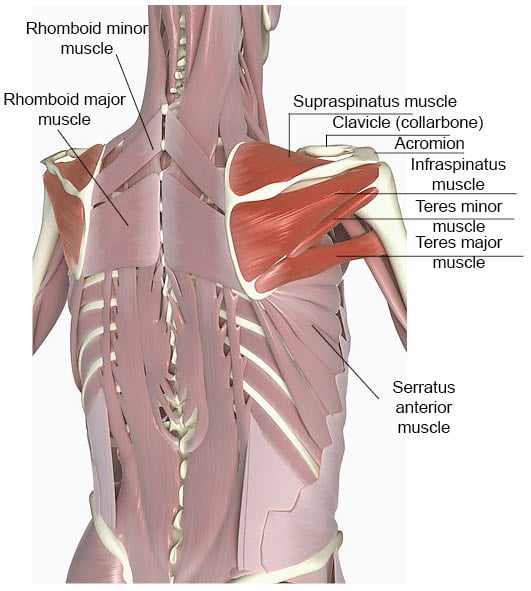
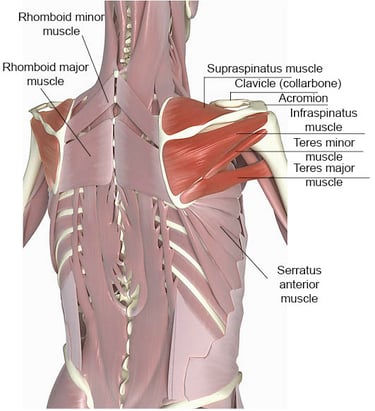
Illustration 9 – muscles of the rotator cuff musculature, etc.
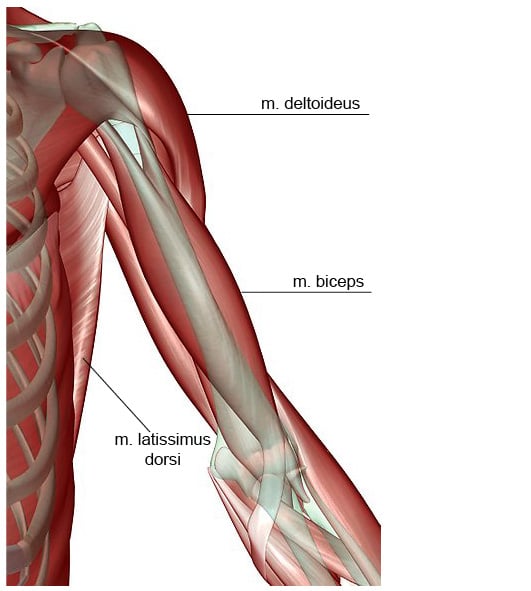
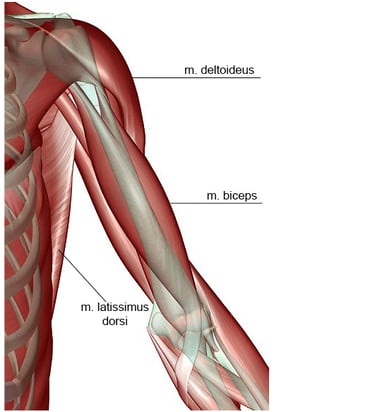
Illustration 10 – shoulder and upper-arm musculature
It has been pointed earlier out that, depending on how we choose to use our skeleton and its positions, there are repercussions for the function of the body. Regarding the shoulder, the position of the spinal column is important, as the shoulder moves forward if we adopt a more rounded position in the rib cage, or moves too far back if we adopt a position that is stretched too far upwards. That is to say, both the flat joint cavity and the posture make it more difficult to find a balance in the function of the muscles, and for the musculature to centre the joint. This then affects the ability of the passing structures, and they become trapped to a lesser or greater degree. Therefore, yet again, there must be adequate balance in the musculature around the shoulder and the shoulder blades. Stamina and strength are required in the musculature, but most important is to become aware of the musculature that holds the shoulder blade down and in, and the rotator cuff musculature, which centres the condyle in the shoulder. It should be emphasised here that the musculature on the front side of the shoulder, the pectoral musculature, can at times, due to its shortening, cause the shoulder joints to be forced forwards, and it can therefore be necessary to stretch the muscle, and/or tighten the rear of the capsule of the shoulder joints, therefore pushing the shoulder joints forward.
The arm
Within the musculature of the upper arms are the biceps, which also affect the shoulder joints and their stability. The biceps consist of two parts: the first part gives stability directed downwards during movement, and the other has a stabilising power directed upwards.
The forearm incorporates almost all the muscles for the hand and fingers – the flexors and extensors of the wrist and finger joints. The flexors of the fingers are, in general, always stronger than the extensors. These extensor muscles and their attachment on the outer condyle of the elbow are a common source of pain. However, one can also have similar problems in the attachment of the flexors at the inner elbow condyle. This is something that can happen when the fingers work under pressure, for example the left hand and fingers of string musicians.
We also have muscles in the forearms that rotate the forearm in relation to the upper arm. These muscles can become overstrained in pianists, and can sometimes feel like a stiff band in the upper part of the forearm. Overstraining comes from the rotation that is needed to turn the palm towards the keys coming only from the forearm. This can be alleviated by making this rotation with the help of the shoulder blade and shoulder (see the Piano Ergonomics section).


Illustration 11 – musculature of the arm

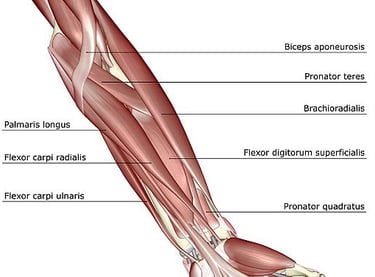
Illustration 12 – musculature of the forearm
The hand
We can have more access to the hand’s potential for power and stamina if it is in a position where the wrist itself is angled upwards at about 15 degrees, and the knuckles can be seen clearly, as well as there being an easy, relaxed curvature in all finger joints.

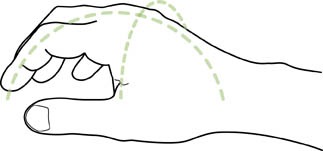
Illustration 13 – the hands at rest + the arch
The anatomy of the hands consists of small bones combined in such a way that, together with muscles and ligaments, they form two different arches. The longitudinal arch is important to be able to maintain and produce power and stamina, and to get the most out of finger activity. The attachment of the fingers in the hand with its arch provides a stable base for the fingers. After this, it is primarily the musculature in the forearms that produce the movements of the fingers. Most of the muscles that extend and flex in the fingers are at their fullest in the forearm and when they reach the hand they are like tendons (see Illustration 12). The transverse arch is held in position with the help of the muscles between the finger bones in the back of the hand – the lumbricals. They maintain a stability of function in the hand so that the knuckles are always visible. If the knuckles sink into the hand so that they are no longer visible, which can happen from playing piano, for example, this results in an increase in muscle strain, especially in the finger extensors.
Illustration 14 – forearm and hand
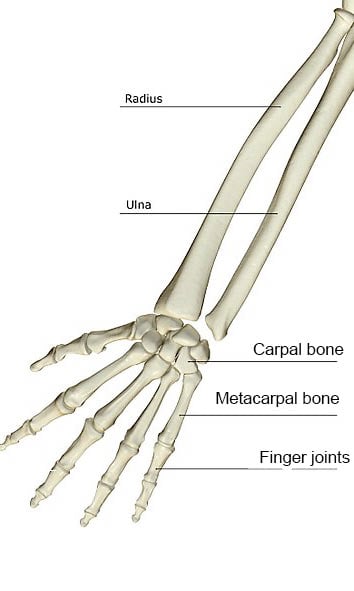

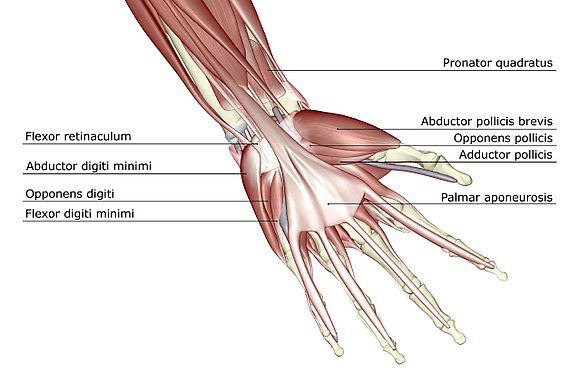
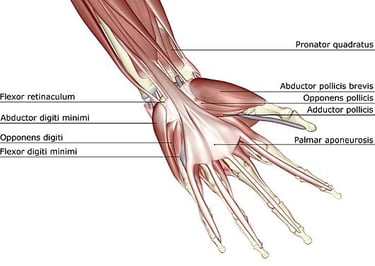
Illustration 15 – hand musculature
When we stretch the middle joints in the fingers, we increase the activity in exactly those muscles that “spread and join together the fingers from the sides”. When we stretch the “knuckle joints”, i.e. when the knuckles “disappear”, the activity in the muscles in the upper forearms increases and this can easily result in tension in this area. We can access the hand’s potential for power and stamina more easily if the position of the hand is closer to the position of rest.
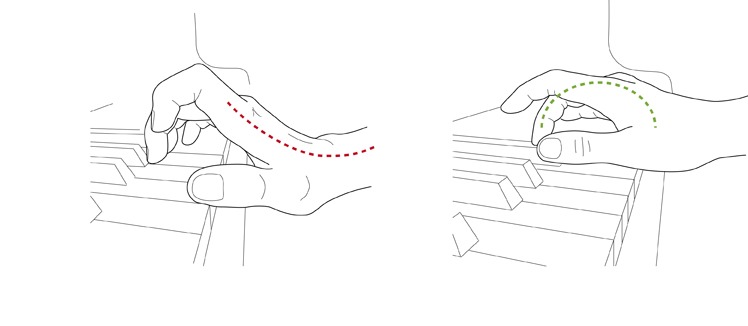
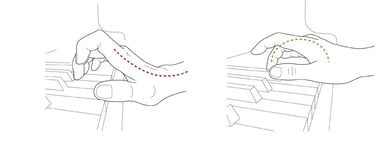
Illustration 16 – overstretched and neutral positions in the finger joints and wrist
The extensor tendons in the fingers are unified, that is, they all originate from the same body of muscle. One exception is the index finger, which has a separate extensor tendon, and the little finger can also stretch separately. The ring finger is the weakest finger in terms of stretching separately. Try to let the middle finger or the little finger follow along when you move the ring finger and observe the difference in ability. For the flexor tendons there are two different types of flexors, where one type, the superficial flexor tendons, have their individual origins in different muscle bodies and contribute to the individual abilities of the fingers to flex in the middle joints of the fingers, where they are also attached. The others, the deep flexor tendons, issue from the same muscle body in the forearm and can therefore not bend separately in the outer joints of the fingers. Occasionally, the superficial flexor tendon in the little finger is missing. In this case, the ability for movement in the little finger is reduced.
There are important muscles situated in the hand itself, such as the muscle that is situated between the bone of the index finger and the bone of the thumb, which allows the thumb to hold objects, for example between the index finger and the thumb. This muscle can at times be too dominant, especially if the “thumb extensors” are strong and the “thumb flexors” are weak. This can easily result in overstretching in the base joint of the thumb, and the area directly beneath falls into the hand. During the stretching/overstretching of the thumb’s joints while gripping, this muscle activates, which also affects the fingers’ ability for relaxed movement in terms of extending and flexing. Try to lay your forearm on the table and stretch all the joints of the thumb strongly; at the same time try to flex and extend your fingers. How does the movement of the fingers feel compared to when the thumb is relaxed? A stretched thumb causes tension in the muscles, both in the muscle that draws the thumb in towards the hand as well as those that keep the thumb stretched.
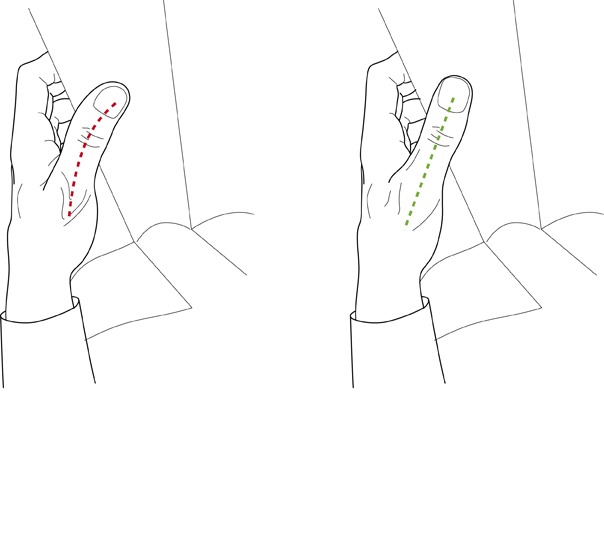
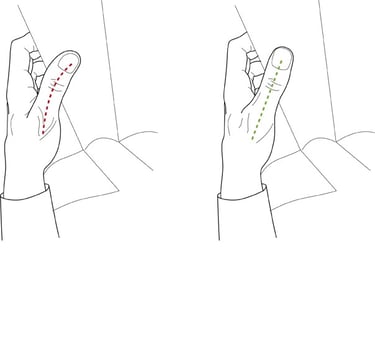
Illustration 17 – overstretched and neutral positions in the thumb
The dilemma regarding the dominant thumb muscle is that the hand was originally designed to be able to hang onto tree branches (as apes). The grip reflex is strong in small children, and as adults we have the remnants of this grip reflex, which always activates the thumb in the grip of the hand when the fingers are performing movements. This is something most instrumentalists need to “unlearn” in order to affect the degree of activity in the thumb and fingers. If you play a bowed or plucked string instrument, especially regarding your left hand, it is important that your thumb is as relaxed and flexible as possible in your movements, otherwise there can often be increased tension around the muscles of the thumb, which can, over time, result in increased tension in the musculature of the hand and arm. How high the level of activity in the muscles of the thumb reaches is crucial in maintaining a relaxed hand-arm motor activity for most instrumentalists. Forming a ring with the thumb and index finger grip is an ideal starting point. There is another muscle in the hand that is worth mentioning – the abductor digiti minimi muscle. This is an important muscle on the side of the little finger that allows the little finger to move outwards. For the other fingers, there are muscles that spread out and pull together the fingers between the finger bones in the middle of the hand.
We are now approaching the final stop on our journey of discovery and awareness through the body, with only the neck and head in standing position remaining.
The neck and the head in standing position
The spinal column continues up to the head via a small curve and then ends with a ring-shaped vertebra with two small joint surfaces upon which the head rests. The head rests on the uppermost neck vertebra, the atlas vertebra, which is shaped like a bowl. During more strenuous bending movements of the head forwards, to the sides or twisting, the skull’s surface against the uppermost vertebra is insufficient for full stability, and for this reason muscles are activated to stabilise the head. The scalene muscles on the front side of the neck hold in the chin, and the suboccipital muscles assist in stretching the head backwards. The head is heavy, around 6–8 kg, and this knowledge alone can be reason to try to position the head so centrally and as balanced as possible in order to minimise unnecessary muscle activity. Try to collapse the body inwards, and round the back. The head will then fall and hang forwards. To stretch the head upwards from this position and look straight ahead demands a great deal of muscle activity in the neck.
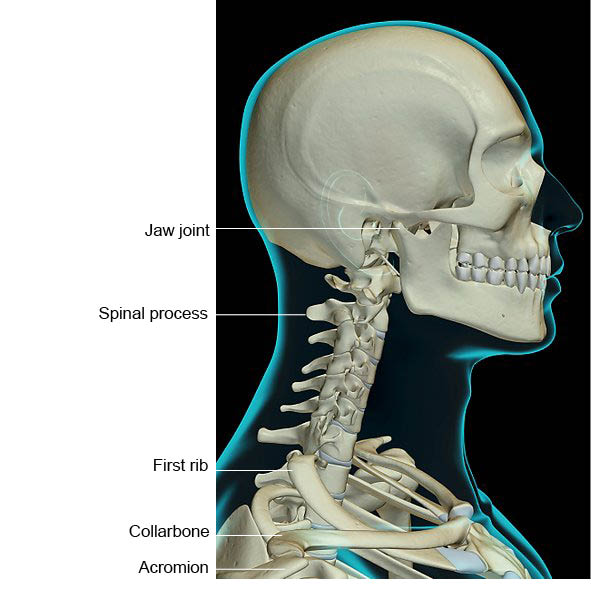
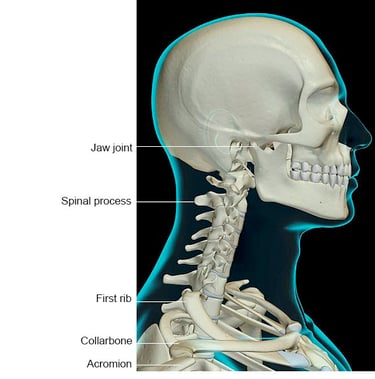
Illustration 18 - neck
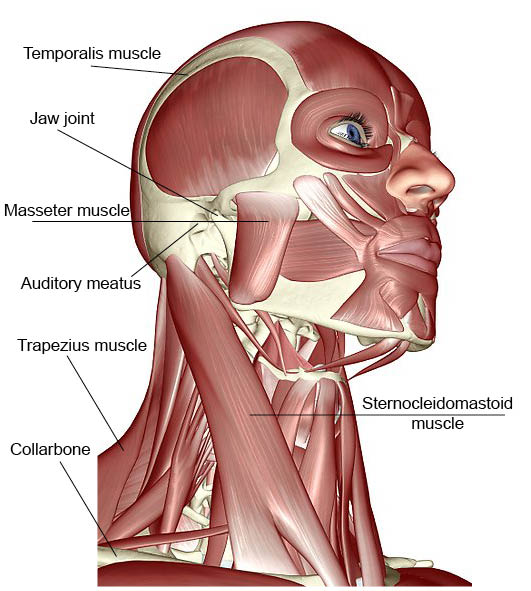
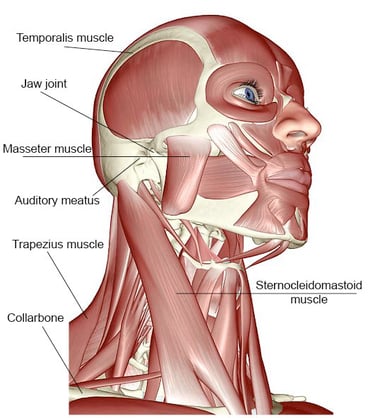
Illustration 19 – facial and neck musculatur
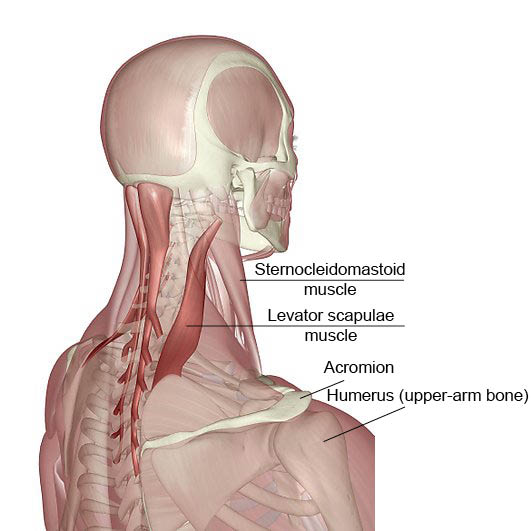
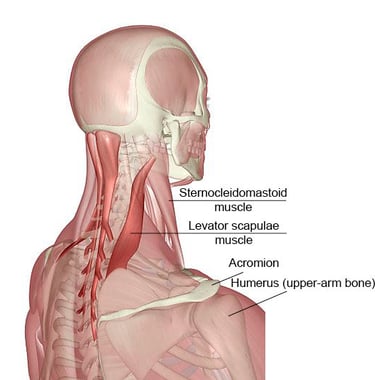
Illustration 20 – neck and throat musculature
As our eyes are situated at the top of our body, the head is the part of our body that we use for controlling and monitoring. It is natural for us to want to see what is happening and at times let our sight lead the head, which is why it comes before the body. This is somewhat more common in the sitting position, for example when we are reading sheet music, or sitting at the piano or computer. If the head comes in front of the body and does not receive optimal support from the spinal column, the body tries to balance itself, compensating in the thoracic spine and pelvis so that we end up in a hunched position. This results in more unfavourable positions, which in turn have effects in terms of functionality and stamina, as discussed earlier.
A common unconscious placing of the head, above all in wind players, is to let the head move forward towards the instrument. The result is that the head slides forwards and the centre of balance shifts to in front of the spinal column, and the curvature of the neck, or the kyphosis of the thoracic spine, increases with high muscle activity in the neck, as above. It also becomes more difficult to hold the arms up in this position. Try, therefore, as a wind player, to form the habit of moving the instrument to the mouth so the head can maintain its position on top of the spinal column. Around the neck and the throat we also have musculature that connects the rib cage and the head to one another, the musculature that makes it possible for us to bend and turn the head. The muscles are strained to a greater or lesser degree depending on what position the head is in. Depending on different types of instruments, it may be necessary for us to position the head slightly turned or tilted. We should try to do this as little as possible as it results in particularly heavy strain and can affect both the tension in the jaws, the position/functioning of the rib cage and the breathing.
The trapezius muscle in the neck can pull the shoulder upwards towards the ears but also pull the head to the side and stretch backwards. The lower part of this muscle helps to stabilise the shoulder blades. The levator scapulae muscle goes between the transverse processes of the neck and down to the point of the shoulder blade, and bends the head to the back and to the side. It is not unusual for this muscle to be the location for torticollis (wryneck).
The jaws
Begin by clenching your jaws as much as you can and then notice your breathing. Does it feel tense or relaxed? Now release the tension and clenching, and let the lower jaw fall naturally. What happens with your breathing? This experience is often described as if the breathing is “taking an elevator ride” down towards the stomach, becoming more free and spacious.
The musculature around the jaws has an enormous capacity of strength despite its small size. The jaw muscle (the masseter muscle, see Illustration 16) is a muscle that is often tensed when there is a feeling of stress or discomfort, in situations where we are trying to “regain control”. It is also the case that, if the position of the body is such that the head has moved outside of its line of balance, gravity tries to pull the lower jaw downwards to open the mouth. Unconsciously, we do not want this to happen. We do not want to sit with the mouth open, and for this reason we close the mouth, i.e. we tense the jaw muscle to keep the mouth closed. This results in an increase in muscle tension, as well as causing a negative effect on the breathing. Yet again, the position of the body is important for the level of tension and breathing capacity.
The tension around the jaws can at times become too strong, for example when the lips close tightly around different types of mouthpieces, even if the posture is stable and balanced. Here the musculature around the mouth and lips is also important. As such, try to form the habit to also be aware of how much power is needed and try occasionally to lessen the power intensity/muscle tension.
Now we will move on and learn about the body in sitting position.
The feet and legs in sitting position
In sitting position we have a larger base area of contact than in standing position. It is usually the buttocks and the back that are supported by the chair. If we want to be able to sit without the support of the backrest and have the weight through the vertebral bodies and down to the base, the pelvis and legs need to be involved. In order to hold the back upright and maintain the position of the pelvis while in sitting position, we should place more weight on the legs than we might think. If we can allow the legs to take more of the torso’s weight, the strain of the weight will not be placed on the pelvis alone. If the weight is placed solely on the pelvis, we will soon be unable to hold ourselves up against gravity, and the pelvis will move backwards, or alternatively, we will fight against this force and bend upwards with too much tension in the muscles as a result. If we allow the legs to take a part of the weight, the pelvis will be able to remain in the same position and increase stability in the back, and we will not fall backwards as easily. In order to have the weight distributed through the legs, we should lean slightly forwards with the torso so that the legs form a surface of relief of stress for the torso. This leaning/movement forwards comes from the hip joints. This position is not relevant if you are an organist or a drummer, however. For these instruments, the legs need to be free in order to take care of the pedals, and the weight and balance must come through the pelvis. It is, therefore, important for such instrumentalists to train their stomach and back musculature.
The pelvis in sitting position
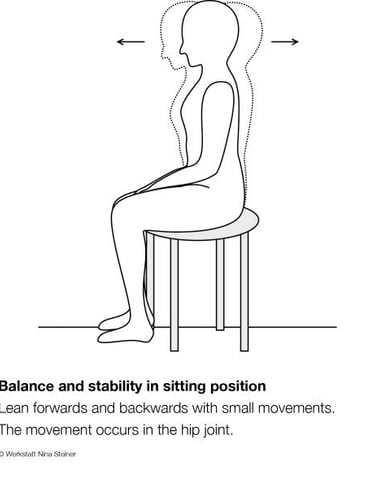
In order to distribute the weight and be able to use our legs, we need to move the pelvis in more of a curved motion, and thus feel that we are sitting on the ischia (the curved bones at the base of the pelvis). Feel what happens in the spine, the shoulders, the shoulder blades, the neck and the head when you allow the pelvis to rock backwards and forwards. Let the pelvis lean fully back, and then fully upwards in a curve, gradually make this movement smaller and smaller, and then stop in a medium position. After this, try to become aware of the ability of your hip joints to move. Test this by folding the torso forwards a little via the hip joints over the legs and then back again, rolling over the ischia. The hip joints are large and stable, and can easily take the weight. You can also try to move the torso in a circular movement and consciously feel the buttocks as a balancing plate upon which it is possible to balance freely and in a relaxed manner.

The shoulder blades in sitting position
The same applies as for standing position.
The shoulders in sitting position
The same applies as for standing position.
The arm
The same applies as for standing position.
The hand
The same applies as for standing position.
The neck and the head in sitting position
The same applies as for standing position; however, in respect to the fact that the head tends to fall forwards, it can easily occur that we are more used to the head being heavier at the front without feeling the muscle activity in the neck. We are not usually aware of how much muscle power is needed in the back of the neck in order to hold the head up. Try to feel this by sitting with a rounded back and the shoulders forward, and allow the head to fall forwards down towards the rib cage. Then lift the head and feel the muscle activity that is required by the neck musculature to lift the head in order to look straight ahead. The suboccipital muscles and the muscles of the jaws and the root of the tongue are all linked, so that if one is tense, then the others will also be tense. By holding the head in a balanced position, tension also decreases in the jaw muscle and in the musculature in the root of the tongue. Tension in these muscles also affects the windpipe, our breathing capacity and the diaphragm.
The diaphragm
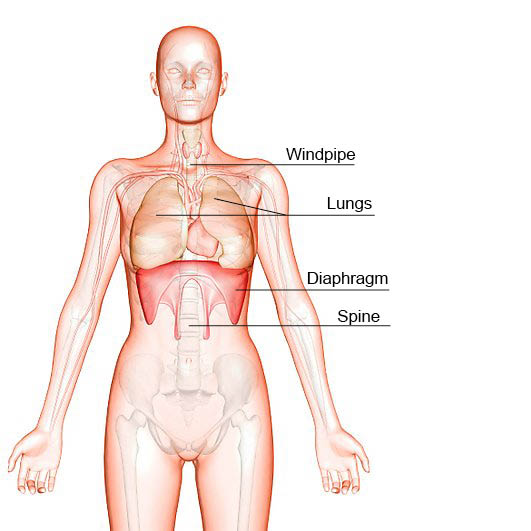

Illustration 21 – the diaphragm
The diaphragm is primarily an inhalation muscle that helps to bring air into the lungs. When the diaphragm pulls itself in and moves down, an underpressure is created that draws air down into the lungs and fills the rib cage. For this movement to be developed, it is necessary for the hip flexor, which originates in the transverse processes in the lumbar vertebrae above, as well as the inside of the pelvis, to release their activity. The hip flexor affects the lumbar spine’s ability to bend, the curve of the hips and the position of the pelvis. The muscle affects the tension in the lower part of the abdomen/back very strongly. If you try to release the ability of the psoas muscles to bend in the hip, then the tension in the abdominal musculature will be released and breathing will become deeper. The abdominal muscles need to be able to expand when the air comes into the whole rib cage and the contents of the abdomen should leave space for the expansion of the diaphragm downwards.
Breathing out is a passive activity, but if you really want to empty the lungs of air, the muscles that sit between the ribs are used, and also the abdominal muscles themselves, the pelvic floor and the hip flexor. The pelvis muscles are also important for breathing. They form the bottom of the actual “bellows”. You can perhaps experience their activity yourself if you try producing sounds such as “sp, sp, sp”. The diaphragm is primarily our inhalation muscle and takes care of breathing in. When we need to take in more air, and to do so more quickly, then the diaphragm is assisted by the neck muscles, chest muscles and ribcage musculature (compared to when we are physically active). If we are anxious or stressed, our breathing can become shallow and rise into the rib cage, and these muscles then join in and help. If this is recurrent and continuous, the body becomes used to breathing more with these assisting muscles than with the diaphragm, and a new pattern of breathing is created in which we have become used to breathing in a more shallow way. This is not very practical in the long run, so try to get used to questioning your own breathing patterns from time to time, and remind your body that the diaphragm should be doing most of the work during inhalation, so the assisting muscles can relax.
An exchange of air then occurs in the lungs in which oxygen is transported into the blood and other waste is carried out with the exhalation air. To have functional breathing in which the exchange of oxygen and waste can occur is a great help for our stamina, both in our muscles and in our mind. Approximately 70% of the body’s residue products, which remain after various processes of combustion in the body, exit with the exhalation. The rest disappears via the skin, the bladder and intestine, and in exactly this order. If this breathing exchange is limited or worsened, there will be consequences, for example in the circulation of the musculature, which then worsens and the pH level in the muscles also worsens, becoming more acidic. If the pH level falls, the muscles tighten and become stiff, and the circulation worsens further, increasing the risk of pain. For this reason, it is good to become aware about your breathing and prepare yourself, both with specific breathing exercises and with movements that increase the circulation. See the chapter on specific exercises.
The diaphragm muscle also directly affects our emotional life and reacts directly to whichever demands, strains and emotions we are subjected to. It can then become tense, preparing itself for a flight-or-fight reaction. (See the chapter on stress).
The diaphragm also has an indirect function in helping the stomach and intestines keep in good condition. When we breathe in, the muscle tightens and sinks. In order for this to happen, the stomach and intestines must be pushed aside, which is why the stomach rises and bulges out during inhalation, massaging the contents of the stomach, if the hip flexor and abdominal muscles are relaxed. Digestion is aided by the diaphragm and the breathing in order to function optimally. When the breathing is tense, suppressed or shallow, this has consequences for mental and muscular stamina and for digestion. Remember that breathing reacts directly to muscle tension, similar to the tension in the jaw as mentioned earlier; however, the opposite direction is also true. If your breathing becomes deeper and freer, muscle tension can also decrease. As such, breathing and muscle tension are intimately connected with one another. Yet another ability that the breathing has is to let itself be controlled at the same time as it continues completely automatically. As mentioned in the section on the pelvis, the position of the body is extremely important for how practical it is for the diaphragm to function.
Try again to feel how the distribution of breathing changes according to which position is adopted. Then maintain the position that feels best. Try to feel what happens in the body, that is, what rises and what falls, expands and contracts if you focus on your breathing and its ability to spread out by focusing on the rib cage, down towards the stomach and pelvis, towards the waist and finally in the back.
Conclusion
We cannot expect to always be in a single optimal position. The body would not be able to cope with this, but rather requires change and stimulation. However, by developing our physical awareness we can give the body more options, feel safe in various positions and feel more quickly when we find ourselves in possibly adverse body positions. The body can handle a great deal; it does not feel immediately bad or find itself in severe difficulties if it occasionally finds itself slightly out of position. The ability to handle this depends on time, power, and again, position – in short, physical awareness. We must also consider that the structure of our day varies, so the body has more energy at certain times and less at others. This is completely natural and for this reason it is not possible to constantly demand exactly the same experience or ability day after day. Instead we need to develop ourselves to be able to handle this change and feel satisfied to be able to perform, even if this ability comes and goes in waves. If you are interested in learning more about anatomy and muscles, we recommend anatomy books by Netter or Sobotta.
Shorter manual to achieve a functional skeletal structure and postural musculature
Standing position
• Start by making yourself aware of your feet.
• Tread on the spot and feel your feet against the floor.
• Tense your knees backwards, then release and bend them a little.
• Allow the knees to be loose and free. Rock them back and forth.
• Tip the pelvis forwards, backwards and around, and find a free and open middle position.
• Curve the thoracic spine and stretch backwards; then stop about halfway in between.
• Twist and shake off tension along the spine.
• Position the shoulder joints and the shoulders by rotating the thumbs outwards, curve the thoracic spine, pull up the shoulders towards the ears and find your way back to a middle position for the thoracic spine. Then slowly release the shoulders downwards and let the thumbs rotate back to their normal position.
• Slide the head forwards as far as possible, but maintain the position of the rib cage. Then slide the head backwards as far as possible and relax. This usually helps the head to find a natural balance. You can also imagine your chin becoming heavy.
• Pay attention to your breathing for a moment.
• Go down to your feet again and swing back and forth a little to find the centre of balance in the middle of the foot. Then release the heels and bounce up and down for a moment.
Standing stability

Sitting position
• Sit with the soles of both feet in contact with the floor. Tread on the spot a few times and feel the natural position for the feet and legs.
• Press the knees together and then relax them; do this a number of times.
• Rock up and down on the pelvis a few times. Feel the outer positions, both forwards and backwards, and then stop about halfway in between.
• Curve the thoracic spine and stretch backwards, and then stop about halfway in between.
• Then fold your torso over from the hip joint slightly forwards over your legs. You can swing a little forwards and backwards, and then stop where you feel the legs are supporting you.
• Twist and shake off tension along the spine.
• Position the shoulder joints and the shoulders by rotating the thumbs outwards, curve the thoracic spine, pull up the shoulders towards the ears and find your way back to a middle position for the thoracic spine. Then slowly release the shoulders downwards and let the thumbs rotate back to their normal position.
• Slide the head forwards as far as possible, but maintain the position of the rib cage. Then slide the head backwards as far as possible and relax. This usually helps the head to find a natural balance. You can also imagine your chin becoming heavy.
• Pay attention to your breathing for a moment.
• Then think of the pelvis as a balancing plate (with the feet offering support). Move the centre of balance in your buttocks in a round movement and pay attention to the feeling of rest and relaxation in the torso.
Sitting stability

3. Ergonomiska råd för specifika instrument
Kapitlen är underlag för diskussion och fundering för att minska på kroppslig belastning. Öppet för synpunkter. (Kapitlet är under bearbetning.)
Några utgångspunkter för samtliga instrumentalister:
För att axlar/armar ska klara instrumentets belastning bra, så börja gå igenom övningar för sittande och stående se video sittande stabilitet och video stående stabilitet så att skulderbladsmusklerna ger en god stabilitet och åstadkommer en känsla av lätthet i armarna. Se till att skuldrorna och skulderbladen befinner sig i en symmetrisk position som möjligt.
Om möjligt försök balansera instrumentets tyngd på båda händer/armar, och kanske använda avlastning med bärrem eller andra avlastande hjälpmedel.
Hand-, tum- och underarmsproblematik är relativt vanligt och uppträningen av handens och fingrarans stabilitet kan lätt glömmas bort. Under Handövningar- video får du tips på hur du kan träna dina händer.
och utgångspunkter för samtliga blåsinstrumentalister:
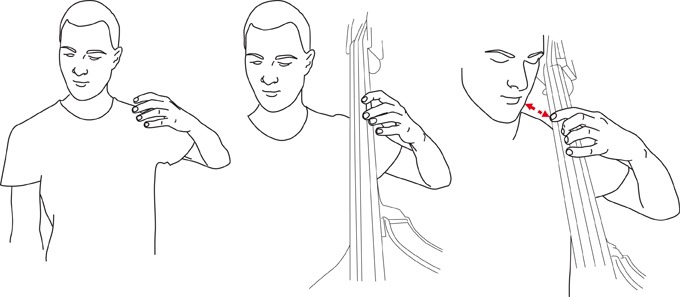
När du väl har funnit en bra ställning för överkropp, axlar och halsrygg, så är det viktigt att föra instrumentet till läpparna och inte tvärtom. Detta för att undvika ökad ”svanhals” i halsryggraden och med det muskelspänningar runt struphuvudet och en ökad belastning på halsryggsdiskarna.
Nu gäller det att hitta en avspänd överkropp så att andning och luftflöde fungerar bra. Alla typer av övningar för att hitta detta är tillåtna, allt från att röra sig med armar och ben för att få igång andningen och pulsen, till mer stillsamma övningar som vid yoga. Målet är att mellangärdsmuskeln ska fungera dynamiskt, så att det inte blir motstånd i andningsmuskulaturen. För detta behövs en stabil överkropp, där kotpelaren vilar tryggt på bäckenet.
När du börjar ta upp instrumentet, så leta efter stödet i bäckenbotten. Om det är svårt att finna, så prova exempelvis med att använda ett ”twooooo” och låt luften flöda samtidigt. Försök att låta bukmusklerna vara avspända och uppmärksamma det som händer i bäckenbotten. Gå omkring i rummet och låt luften flöda in och ut. Det ska vara som en enda cirkelgång. Det finns inget stopp.
3.1 Ergonomi violin-viola
Kroppens ställning utan och med instrument
En kroppshållning som ger gott stöd för skuldermusklerna och skulderbladets stabila position mot bröstkorgen är en förutsättning för att undvika muskelbesvär i axlar/nacke. Här kommer en övning för detta: Stå stadigt på båda fötterna med höftbredd, utan att låsa knäna. Väg över med jämvikten på höger respektive vänster fot och känn friheten åt vänster, när du står på vänster fot och åt höger när du står på höger fot. När du har lika balans mellan fötterna, så utgår spelaktiviteten från kroppens centrum. Sträck hela kroppen och armar/händer rakt upp, så lång du kan bli. Släpp sedan ner båda armarna samtidigt till en avspänd position med 90 graders böjning i armbågarna och avspänt med cirka 60 graders vinkel med armarna utåt.
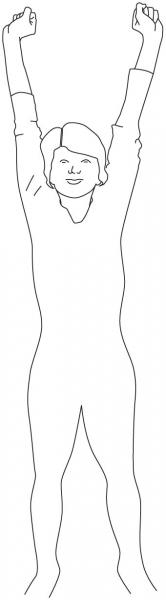

Bild 3.1.1 Stå med axelbredd mellan fötterna stadigt, sträck maximalt uppåt med händerna. Tag ett djupt andetag. Nu bara släpper du ut luften och låter armarna falla ner åt böjning i armbågarna.
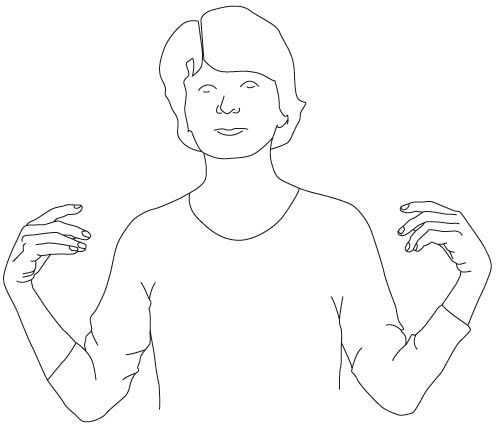
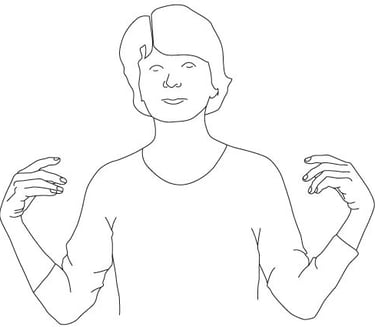
Bild. 3.1.2 Nu har armarna fallit ner i ett viloläge med armbågarna böjda och du står kvar i övrigt som tidigare.

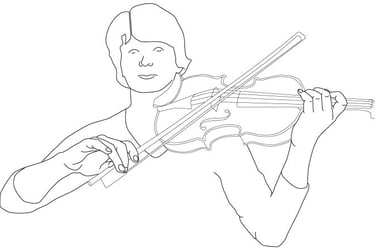
Bild 3.1.3 Utifrån föregående position tar du nu instrumentet med samma känsla i axlar och armar och kropp i övrigt.
Här har du en bra utgångsposition för fiolspel. Det är också avgörande att det är symmetri mellan de båda axlarnas aktivitet, att inte den ena axeln dras framåt under spelet. Då blir det en extra belastning på själva axelledhuvudet och på de muskelsenor, som fäster där.
För inställning av kroppen i sittande och stående var god se även video stående stabilitet och video sittande stabilitet. Finns också en kort film om fiolspel som du hittar här. video fiolspel.
Inställningen av instrumentets olika stöd
När du tar instrumentet till kroppen så börja med att ställa in de båda stöden, hak- och axelstödet. Sträva efter att skuldror/skulderbladen är symmetriska. Undvik konstant rotation och sidoböjning i halsryggraden, eftersom det innebär en ökad belastning på vissa delar av halsryggraden, på diskarna och på vissa muskler. Musklerna blir då med tiden kortare på den böjda/roterade sidan än på andra sidan och slitaget på halskotornas diskar och senband blir också mer än på motsatta sidan.
Målet är att utnyttja huvudets tyngd så att du undviker känslan av att behöva klämma fast fiolen. Låt helt enkelt huvudet vila med hela sin tyngd på hakstödet utan att lägga på muskelkraft. Försök hitta en höjd på stöden, så att du inte behöver göra en konstant sidoböjning i halsryggraden. Hakhållaren bör vara utformad, så att du får ett bra och bekvämt grepp med kindben och haka och kan variera huvudets placering.
Börja med att ta av axelstödet och låt någon annan person placera instrumentet på nyckelbenet, fortfarande utan att försöka hålla fiolen fast själv under hakan. Känn efter vilken vinkel i rotationen av instrumentet (cirka 45 grader), som du vill ha på instrumentet, när du ska spela med stråken. Undersök hur mycket som behöver kompenseras i höjd, först vad avser axelstödet och därefter hakhållaren. Använd gärna något att mäta med för att sedan förändra stöden, så att det stämmer. Tänk på att inte kompensera fullt upp med stödet för hakan, utan att det finns flexibilitet att ändra på huvudets ställning. Låt det finnas kvar en möjlighet att rotera eller sidböja huvudet, att kunna vara rörlig och flexibel i spelet.
En lång hals kräver högre hakhållare medan sluttande axlar kräver högre axelstöd.
Vid notstället
I samspelssituationer tex. när du sitter framför notställ, så måste du kanske rotera med instrumentet för att få bra kontakt med både medspelare, dirigent och noter. Prova då att rotera nerifrån bäcken och höfter, inte uppe i höjd med skulderbladen. Det bästa är naturligtvis om det går att rotera stolen, som du sitter på. Använd ett aktivt sittande när du spelar dvs att spela utan ryggstöd men med en stabil överkropp. Utifrån ett stabilt utgångsläge varierar du balansen framåt, bakåt och i sidled och på detta sätt varierar tyngdpunktens placering.
Balansen med stråken och instrumentets placering
Undersök balansen mellan stråken och instrumentets placering. Leta efter känslan av att centrum av aktiviteterna stämmer med kroppens centrum. Om instrumentet kommer för långt ut åt vänster sida, så ger det en ökad ansträngning i stråkarmen, speciellt vid spel på G respektive C strängen.
Ju mer fiolen kommer ut på vänster sida ju mer får du följa med i stråkarmen, för att kunna spela och centrum för aktivitet stämmer inte med kroppens centrum. Det blir en ökad belastning på en av kroppssidorna. Om du vill spela med instrumentet ganska horisontellt, så medför det att stråkarmen måste komma högre upp jämfört med om du vill spela med en större vinkel än 45 grader, så då kan det bli ett litet lyft i vänster axelled.
Vänster hands placering
För bra handställning, så börja med att placera lillfingret och därefter övriga fingrar, för då blir spänningen i handens små-muskler mindre. Bild 3.1.4-5. Annars kan smärtor uppstå i dessa muskler och kännas bort mot armbågens muskelfäste.
Vänsterhandleden mår bra om den ofta har möjlighet att komma tillbaka i en avspänd position dvs att minska på inåtrotationen och böjningen i handleden. Låt armbågen hänga tung och fri. Armen måste röra sig fritt under instrumentet. Vid spel i första till tredje läget på låga strängar ska armbågen följa med framåt och vid de högre strängarna bakåt. Detta ger en rörelse i vänster axelleden som stimulerar cirkulationen i vänster skuldra. En aktiv rörelse uppåt och neråt med instrumentet bör också tillämpas vid språng mellan höga och låga lägen.
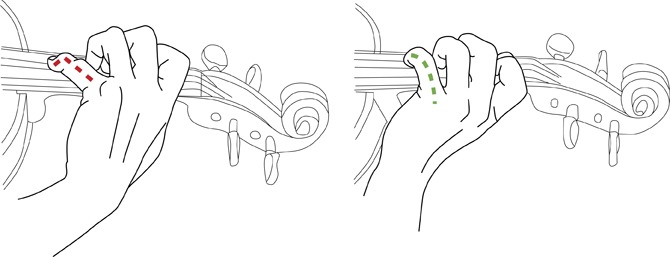
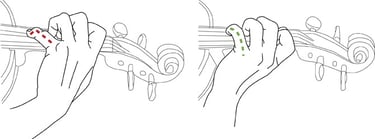
Bild 3.1.4: Vid placering av 1:a fingret först på greppbrädan och med bibehållen handställning, så ökar spänningen i den böjda handleden och i handryggens muskler.
Bild 3.1.5: Vid spel med 4:e fingret, så blir spänningen i handen mindre om man låter lillfingrets ställning vara utgångspunkten.
Stråken
Stråkinstruktionen är densamma för violin och cello och utgångspunktern är grunderna i fysiologi och ergonomi.Observera hur mycket kraft du använder för att hålla stråken med tummen, pekfingret och långfingret. Det är kraften i detta grepp, som är avgörande för både smärta i tummen och i armen i övrigt. Prova hur löst du kan hålla i stråken och ändå behålla kontrollen.
Börja med en övning utan stråken. Stå ledigt på golvet med höftbredd mellan fötterna. Prova en rörelse med stråkarmen. För armen fram och tillbaka i en rak linje. Prova därefter att göra rörelser i cirkel, ellips, åtta osv med känslan av att rörelsen styrs från armbågen. Hur blir känslan i kroppen och hur blir andningen?
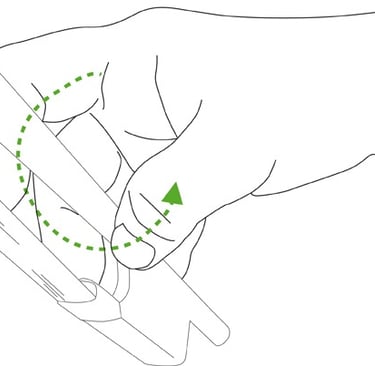
Tummen ska inte vara i översträckt läge i tummens mellanled, för då blir tum-muskeln överansträngd och tummens leder blir ”låsta”. Tumme, fingrar och hand behöver ha en bra stabilitet och funktion för att kunna vara avspänd. Hur du tränar upp denna stablitet kan du se under Handövningar- video

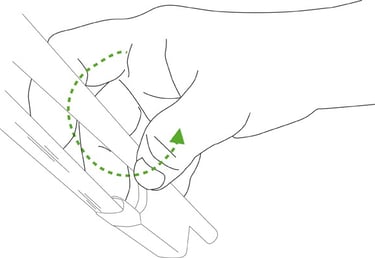
Bild 3.1.6: Att eftersträva en avspänning i greppet tumme/pekfinger med en böjning i tummens leder.
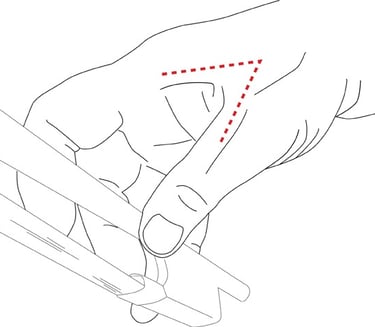
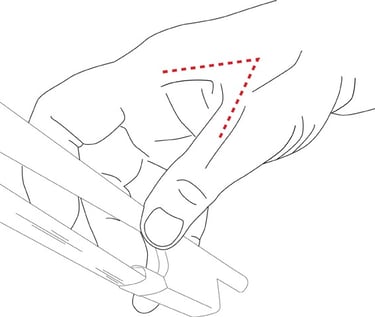
Bild 3.1.7: Här blir belastningen större på ”tumknogleden”, som blir mer låst och belastad.
3.2 Ergonomi cello
Sittställning utan och med instrument
Hitta en stabil position för överkroppen och för skuldran, så att armarna och händerna är fria. Börja med video sittande stabilitet för att hitta en stabil position för överkroppen. Vilken kraft du behöver använda för att få en bra tonkvalité i instrumentet beror både på din kroppsposition och på positionen av instrumentet i förhållande till kroppens tyngdcentrum. Nu gäller det finna en bra placering för vänsterhanden med tanke på vilken effekt det får på skuldermuskulaturen och på övriga muskler i nacke-rygg.
Prova olika ställningar för handen i förhållande till halsryggraden och skuldran. Placera instrumentet där det känns mest bekvämt, när du känner utan instrument. Jämför med inställningen med kontrabas.
Tag nu fram instrumentet och prova nu att låta överkroppen följa med i de rörelser som hand-arm sätter igång när handen-fingrarna flyttar till olika ställen på greppbrädan.
När du sedan ska flytta fingrarna på greppbrädan, så låt rörelsen vid växlingar mellan olika strängar ge den rättmätiga rotationen över greppbrädan och följ med i kroppen med rörelse som känns ända ner ifrån bäckenet. När du kommer upp i höga lägeväxlingar, så låt kroppen få följa med i en liten framåtböjning från höftregionen.
Stråken
Stråkinstruktionen är densamma för violin och cello och utgångspunktern är grunderna i fysiologi och ergonomi. Observera hur mycket kraft du använder för att hålla stråken med tummen, pekfingret och långfingret. Det är kraften i detta grepp, som är avgörande för både smärta i tummen och i armen i övrigt. Prova hur löst du kan hålla i stråken och ändå behålla kontrollen.
Börja med en övning utan stråken. Stå ledigt på golvet med höftbredd mellan fötterna. Prova en rörelse med stråkarmen. För armen fram och tillbaka i en rak linje. Prova därefter att göra rörelser i cirkel, ellips, åtta osv med känslan av att rörelsen styrs från armbågen. Hur blir känslan i kroppen och hur blir andningen?
Tummen ska inte vara i översträckt läge i tummens mellanled, för då blir tum-muskeln överansträngd och tummens leder blir ”låsta”.

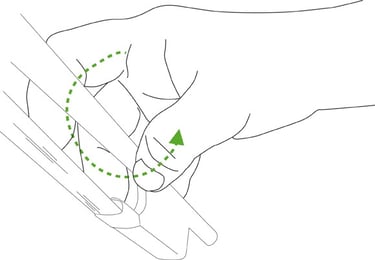
Bild 3.2.3: Att eftersträva en avspänning i greppet tumme/pekfinger med en böjning i tummens leder.


Bild 3.2.4: Här blir belastningen större på ”tumknogleden”, som blir mer låst och belastad.
Handens ställning
Vi har alltid kvar vår gripreflex i handen med ökad aktivitet i tummen, när fingrarna ska vara aktiva. Detta kan leda till en onödig spänning i handen och armens muskulatur. Vänstertummen ska helst vara inaktiv, men vara det viktiga och följsamma stödet.
Om du har kort lillfinger, så är det mindre belastning för muskulaturen om du använder tyngdöverföring, när vänster lillfinger ska spela. Det omvända gäller också att när du spelar med pekfingret, så ligger handens tyngdpunkt genom fingret och fingerblomman. Om du spelar med översträckta fingrar, låser sig fingrarna lättare.
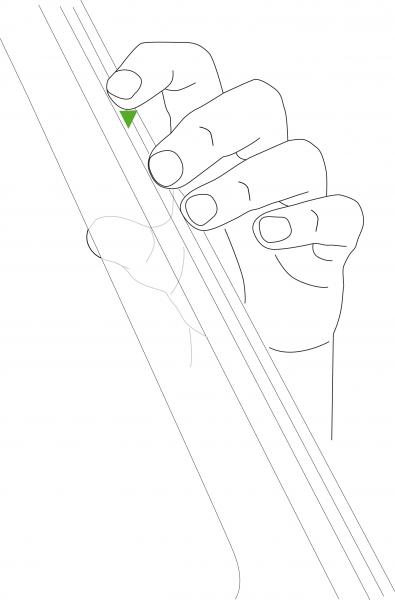
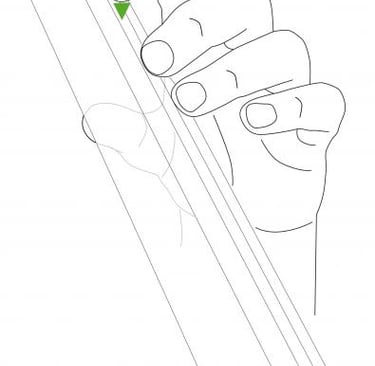
Bild 3.2.2-3: Tyngden ligger nu på pekfingret och underarmen är något i inåtrotation.
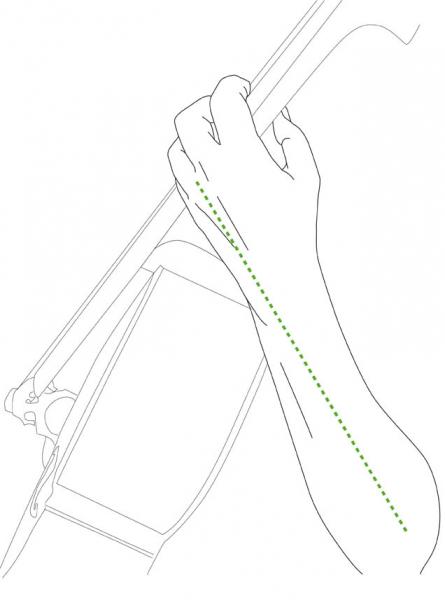
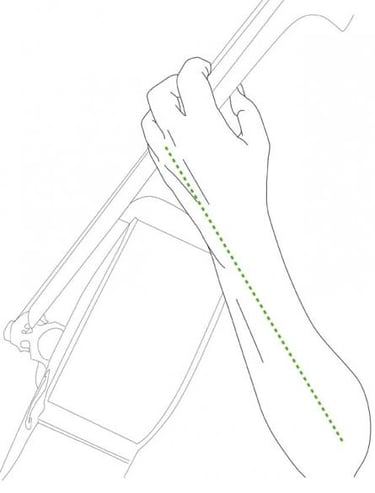
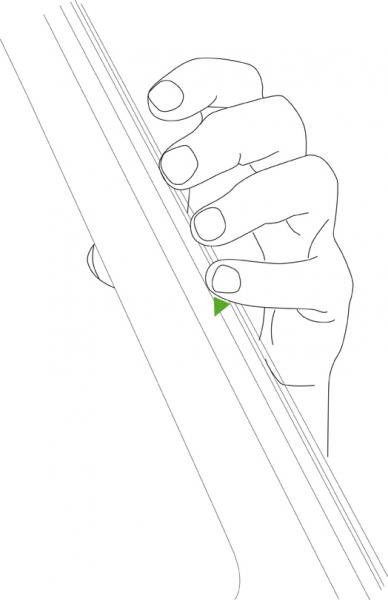

Bild 3.2.4-5: Tyngden har nu förflyttats till lillfingret och underarmen är lätt roterad i utåtrotation.
Fingrarnas position är också avgörande för snabbhet och precision. Prova att sätta handen på greppbrädan med sträckning i alla tummens leder och känn på fingrarnas frihet i rörelse jämfört med när tummens leder är lätt böjda. Vill du träna upp handens och fingrarnas stabilitet rekommenderas Handövningar- video

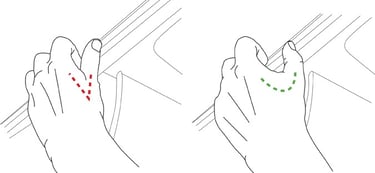
Bild 3.2.6: Alla tummens leder är sträckta och låsta i denna position. Bild 3.2.7: Handens ställning blir stabilare och friare i de olika lederna, fingerknogarna framträder tydligare.
Prova tyngdöverföring från skuldran, ner genom armen och till fingerblomman. Känn att det är en sammanhängande kedja utan att pressa/trycka fingrarna mot greppbrädan.

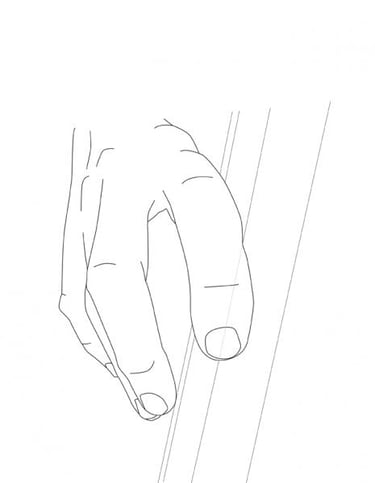
Bild 3.3.11: Fingret har strängen mellan yttersta leden och fingerblomman.
Kraften i anslaget riktas in mot din egen kropp och fingret glider av strängen under rörelsen.
Om du spelar med översträckta fingrar, så blir det också lättare att fingrarna låser sig.
I ”tumlägena”, så blir spänningen mindre om tummen har en lätt böjning i den yttersta leden. Vill du få tips på hur du kan träna upp stabiliteten i dina händer gå vidare till Handövningar- video.
Prova tyngdöverföring från skuldran, ner genom armen och till fingerblomman. Känn att det är en sammanhängande kedja, istället för att pressa/trycka fingrarna i greppbrädan. Till sist: använd andningen när du spelar för att musklerna i kroppen ska få växla i spänning.
Pizzicatoteknik med höger hand
Tummen är stödpunkt på greppbrädan och rörelseimpulsen kommer från arm/axel, för att minska belastningen på fingrarna. Tummen bör hamna på greppbrädan, så att handen fortsätter att vara i rät linje med underarmen, för att inte handleden ska bli extra belastad. Strängen bör placeras någonstans mellan första leden och fingerblomman i höjd med nagelbandet.
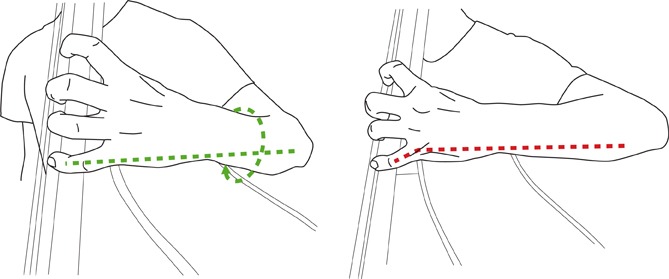
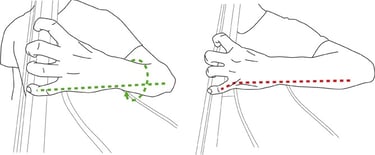
Bild 3.3.7: Här är underarmen lätt utåtroterad för att tyngden ska kunna överföras till lillfingret och minska på spänningen i handen.
Bild 3.3.8: Här ses en ökad spänning i lillfingret som nästan får vika sig i ytterleden.
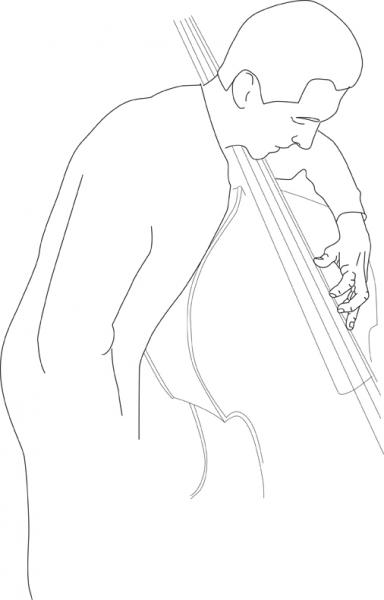

Bild 3.3.6: Med framåtböjning nere ifrån höftplanet, så blir det ingen dragning i själva axelleden.
Vänsterhandsgrepp med större avstånd mellan 4:e och 5:e fingrarna är belastande för underarmens muskulatur på utsidan framförallt.
Vid användning av ”hängteknik” i vänster hand, så kan det bli en ökad böjning i själva handleden, vilket kan leda till påfrestning av disken som finns i själva handleden. Den blir helt enkelt klämd. För att undvika det, så behöver armbågen lyftas något utåt och på detta sätt kan det också fungera bättre med tyngdöverföring till fingrarna.
Om du har kort lillfinger, så är det mindre belastning för muskulaturen om du använder tyngdöverföring, när vänster lillfinger spelar.
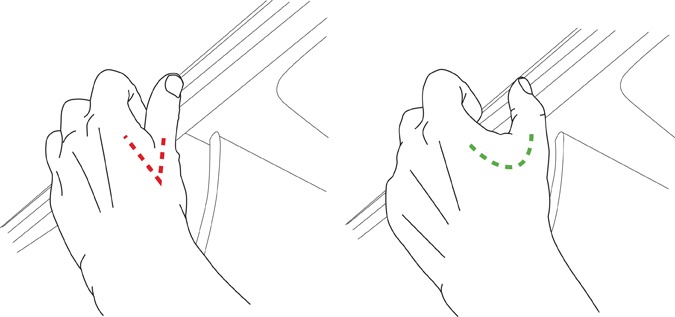
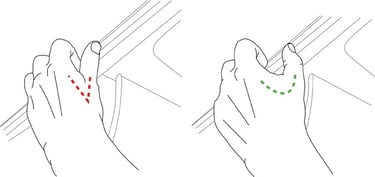
Bild 3.3.9: Fingrarnas ställning blir mer låst, då tummens leder är sträckta och mer låsta .Bild 3.3.10: När tummens leder är lätt böjda och avspända, så blir handens ställning stabilare och friare och de olika fingerknogarna framträder tydligare.
I tumlägena behöver du luta överkroppen framåt så att den stabila bålen behålles och armen räcker till. Prova att med en tänkt rörelseaxel genom höftlederna luta mer eller mindre framåt.
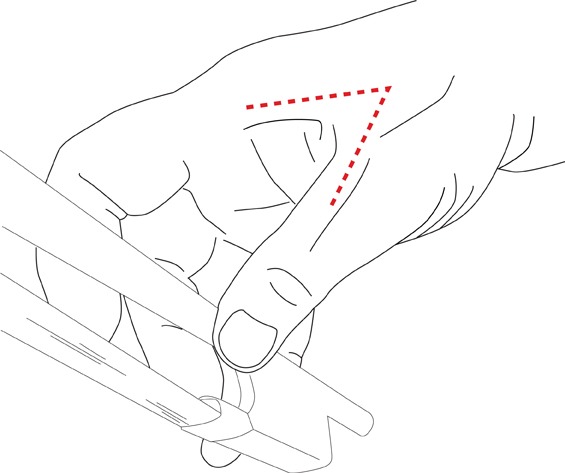
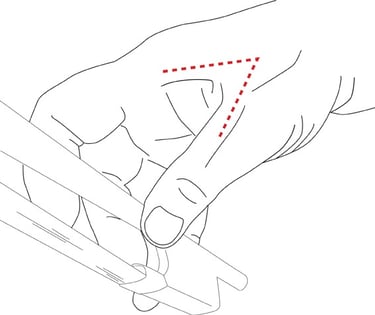
Bild 3.3.4-5: Att eftersträva en avspänning i greppet tumme/pekfinger med en böjning i tummens leder, för att minska på belastningen av tumlederna.
Handens ställning
Vänster tumme ska vara följsam men utan att du klämmer/pressar tummen mot greppbrädan. Vi har alltid kvar vår gripreflex i handen med ökad aktivitet i tummen, när fingrarna ska vara aktiva. Detta kan leda till en onödig spänning i handen och armens muskulatur. Se till att muskeln mellan tumme och pekfinger har låg aktivitet.
Stråken
Övning med och utan stråke
I själva handgreppet tumme/fingrar är det viktigt att kraften är minsta möjliga. Tummen ska inte vara i översträckt läge i tummens mellanled, för då blir tum-muskeln, som sitter mellan tummen och pekfingret överansträngd och tummens leder blir ”låsta” och fingrarnas rörelser blir inte så fria.


3.3.1. Börja med att hålla arm/hand i en bekväm position utifrån halsrygg och axel.
3.3.2. Ta nu instrumentet till samma position som tidigare kändes bekvämt utan instrument.
3.3.3. Handleden blir här spänd av sin inåtböjning. Genom att ändra på greppbrädans vinkel alternativt föra armbågen utåt, så kan detta undvikas. Här är greppbrädan placerad betydligt mycket närmare halsryggraden än i bild 3.3.2.
För sittposition gå till video sittande stabilitet och försök i sittande ställning hitta en stadig position med båda fötterna i golvet eller på stöd på stolen, men arbeta utan ryggstöd för att vara fri. Placera instrumentet med vinkel, så att du minimerar sträckningen av vänster arm bakåt, för att komma till 1:a läget. Vinklingen/rotationen av instrumentet beror på hur det fungerar med stråken på översta och nedersta strängarna. Prova olika vinklar och känn efter vad som händer i axlar/nacke. Kanske går det att ändra på vinkeln när du behöver komma åt den lägsta strängen.
3.3 Ergonomi kontrabas
Kroppsställning utan och med instrument
Prova video stående stabilitet för att hitta ett stabilt och bekvämt stående och försök hitta en stående position med båda fötterna stadigt, så att det finns en frihet att skifta med tyngdöverföringen till de olika benen. Ett stående där det finns en känsla av att det finns lite olja i lederna, stabilt men inte helt låst, som det kan bli när du står med översträckning i knäna. Placera instrumentet med stöd på vänster sida nära intill bäckenkanten.
Övning för att undersöka vänster handens placering
Nu är det dags för en övning med vänsterhandens och instrumentets placering med tanke på vilken effekt det får på skuldermuskulaturen och på övriga muskler i nacke-rygg. Uppmärksamma hur det känns i axeln och också hur andningen blir.
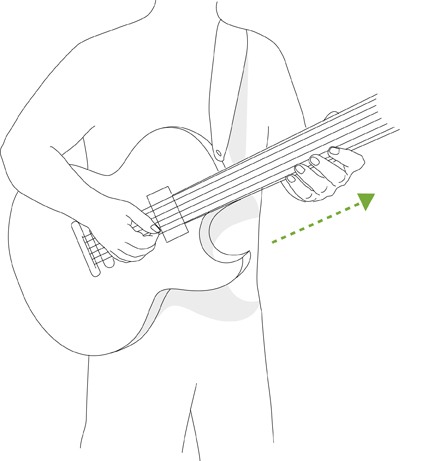
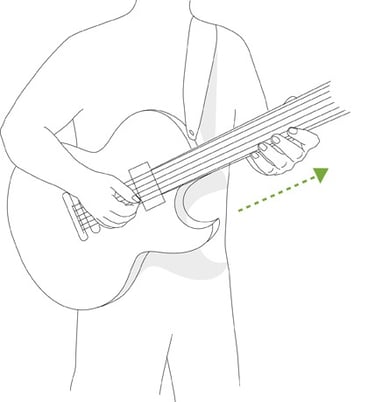
Bild 3.4.2: I denna position hamnar handleden i extrem inåtböjning, vilket fungerar om det bara används i kortare stunder. Undantaget blir i Barrégreppen. Då det erfordras ett rakt finger för att få strängkontakt. Att prova hur andningen fungerar är ett bra mått på hur avspänd du är i överkroppen när du spelar. För att åstadkomma det behöver du kunna finna en upprätt position utan stöd för ryggen.
Vill du ha tips gällande hand och fingertränig gå till Handövningar- video och vill du titta på en film om gitarrspel hittar du den här. video gitarrspel
El-gitarr/el-bas
Vid spel av el-gitarr/bas prova att placera gitarren horisontellt och mer diagonalt ut från kroppen alternativt stå upp, för då är det lättare att låta greppbrädan vara mer uppåtriktad, diagonalt.
Bild 3.4.1 Se till att greppet tumme-fingrar är avslappnat. Tummen finns där för att stödja. Titta på hur spänd muskeln är kring tumbasen. Det behöver finnas lite ”luftigt” utrymme inne i handen då fingrarna är placerade på greppbrädan.

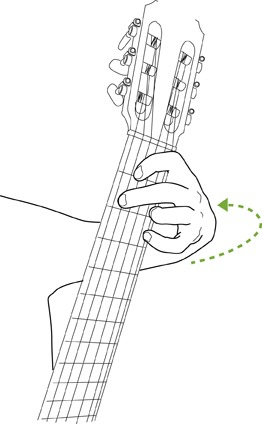
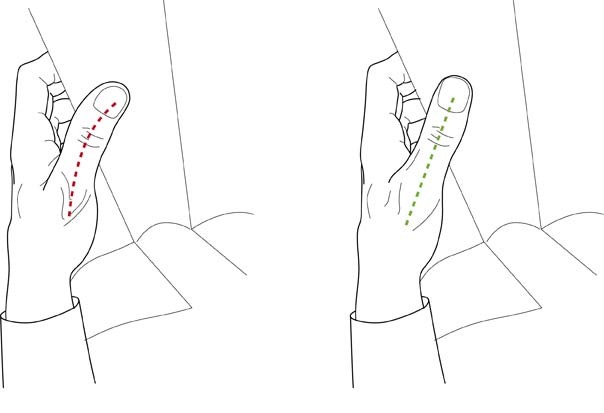

Kroppsställning utan och med instrument
För att finna ett stabilt sittande gå till video sittande stabilitet innan du tar med instrumentet. Sittpositionen är krävande för ryggen, då vi endast kan böja i höftleden upp till 60 grader och resterande böjning, när vi sitter, sker då i ländrygg/bäcken. Bäckenet/ländryggen kommer då att bli mer ”rundade” och det är inte lika lätt att sitta ”upprätt” i bäckenet och ge ett stöd för kotpelaren i upprätt läge.
Målet är att behålla bäcken och ländrygg i upprätt läge samt att undvika ojämn belastning på rygg- och bäckenmusklerna som vid användande av stödpall under vänster fot. När man använder stöd så att vänster fot kommer högre upp, så blir resultatet en snedbelastning av ryggen. När du tar instrumentet, så prova och sitt framför en spegel, för att se att du undviker asymmetri med olikställda axlar. Detta kan annars bli en orsak till smärtor i axlarnas muskulatur och även till smärtor i själva axelleden om belastningen blir ojämn under lång tid.
När du går igenom sittövningen så uppmärksamma vad som händer i kroppen och speciellt hur det känns i muskulaturen runt bäcken-ländrygg och uppe runt skuldrorna. Målet är att finna stabilitet i de olika positionerna utan att låsa våra småleder, så att koncentrationen kan ligga på de perifera musklerna och deras viktiga finmotorik.
När du gör övningarna så är andningen en bra test på hur avspänningen fungerar.
Instrumentställning och handställning
Kroppshållningen påverkar också vänster handens grad av inåtböjning. Gitarrens grundplacering påverkar både vänster och höger handledernas ställning.
Prova att ha greppbrädan mer diagonalt. Försök därefter hitta en ställning så att höger hand inte kommer att befinna sig i ständig utåtvinkling i själva handleden. När höger underarm vilar mot gitarrkanten så kan det trycka på nerven som ligger nära armvecket. Prova ut minsta möjliga tryck. I själva anslaget eftersträva att fingerkraftens riktning hamnar i 90 graders vinkel mot strängriktningen och att själva anslaget kommer att hamna mellan nageln och fingerblommans kant.
Vänster hand: Eftersträva låg aktivitet i vänster tumme. Tummen ska vara ett stöd i rörelserna. Försök undvika att pressa med fingrarna och klämma med tummen runt greppbrädan. Hur fingrarnas placering och användning på greppbrädan är får konsekvenser för hur belastningen i hela armen/skuldran blir. Handen och fingrarna fungerar bäst, då fingerblomman har kontakt med strängen så att fingret får en lätt böjning i alla lederna.
3.4 Ergonomi gitarr
Bild 3.4.3. I denna position med gitarren och greppbrädan ut från kroppen, så hamnar både vänster och höger handled i en gynnsam position. På det här sättet undviker du i stort sett böjning i den vänstra handleden under själva spelet. Se till att gitarren hamnar så långt ner i bäckenhöjd, att höger hand hamnar så lite som möjligt i en inåtböjd position. Eftersträva att höger handled blir så rak som möjligt.
Bild 3.5.9: Lyfter pekfingret med ökad böjning i fingrets ytterleder och sträckning i fingerknogleden, ökar spänningen och låsningen i fingrets leder.
Bild 3.5.10: Släpp något på böjningen i fingrets samtliga leder.
Du kommer då att ha mer energi till anslaget och lättare kunna utnyttja fingrets tyngd. Använd rundade fingrar i spelet, för då blir det mindre spänning i muskelsträckare och -böjare. Man ska kunna se fingerknogarna under själva spelandet. Om lillfingret är kort, låt armen följa med i spelet och hjälpa till medelst en lätt rotation i underarmen, så att det blir hel tyngdöverföring till lillfingret.
Tummens läge i spelet
Tummen får olika lägen då händerna förflyttas på tangenterna utåt sidorna, då tummen behöver vara i underläggning dvs. mjukt förberedd inne i handen till att det är dags. Vid spel in mot centrum blir det fingrarna som förbereder sig genom att lägga sig över tummen.
Kretsa med handen i femfingerövningar, där armbågen kommer att göra en rörelse i en ellips. Tyngdpunkten kommer att flyttas när 4:e och 5:e fingrarna spelar. Se till att din tumme är avspänd när du spelar med handens övriga fingrar.
Titta gärna vidare och bli inspirerad här under Pianoövande.
Anslaget
Utgångspunkter i fingerspelet: Förbered fingret för anslag genom att låta fingret vara nära tangenten och att inte lyfta med kraftig böjning i fingerlederna. När du lyfter fingret så försök göra en lätt sträckning utan överaktivitet i fingret, därefter släpp på sträckningen och spela.

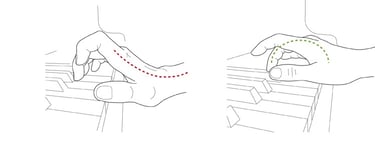
Bild 3.5.8: Nu är rotationen gjord i skuldran och då följer underarmen med och nu är handen färdig att spela på klaviaturen. Muskelspänningen i underarmen minskar betydligt.

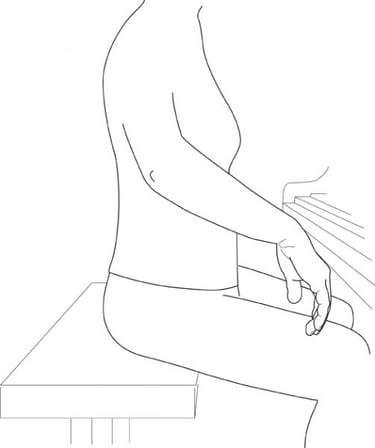

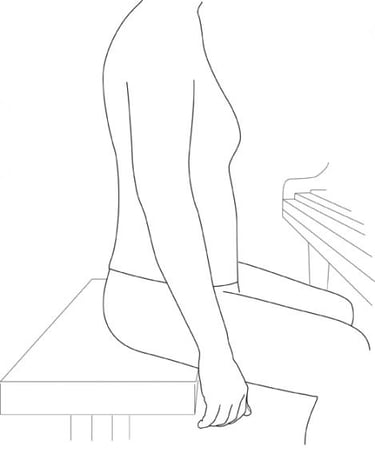
Bild 3.5.7: Armen hänger avspänt längs med sidan och då pekar tummen framåt och handflatan in mot sidan på kroppen.
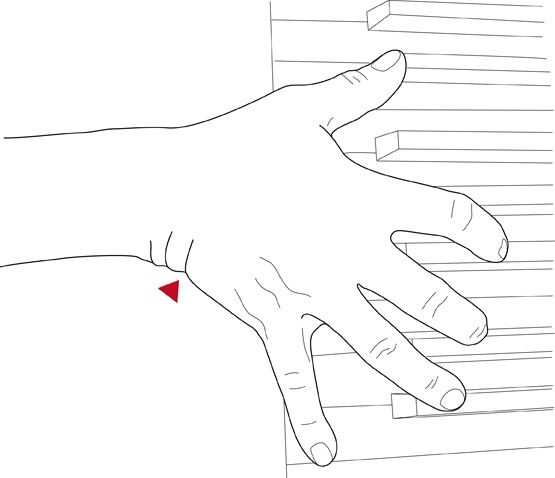
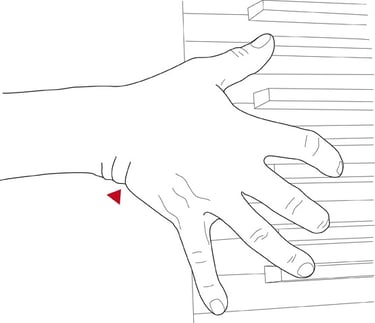
Bild 3.5.5: Vid stora handgrepp hamnar handleden i en lätt utåtvridning
Det viktiga är att kunna släppa denna handställning så fort det är möjligt. (Denna sidoböjning kan annars bli en orsak till smärtor i muskulaturen ända upp till muskelfästen vid armbågen på ”lillfingersidan”).
Styrningen av motoriken i handen/armen
Lyft armarna med en ”tänkt” tråd på utsidan i höjd med armbågarna. Låt armbågarna befinna sig i nivå med de vita tangenterna. Släpp därefter ner handen/fingrarna på tangenterna. När du förbereder dig för att placera händerna på tangenterna, så prova att göra inåtrotationen (nödvändig för att fingrarna ska komma i ”tangentplanet”) med skuldrans muskuler och inte i underarmen. Börja med att låta arm/hand hänga längs med kroppen. Innan du placerar händerna på tangenterna, så roterar du inåt i skuldran. Då är händerna färdiga att placeras på tangenterna.
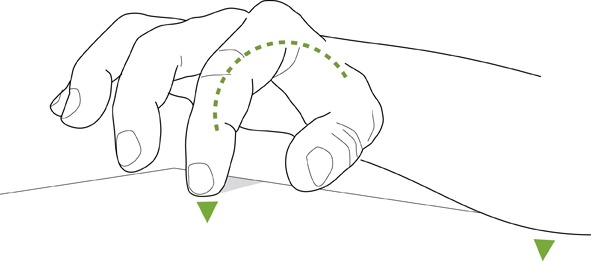
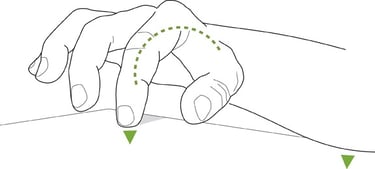
Bild 3.5.4: Sitt vid ett bord och låt underarmen vila stadigt på bordet. Låt hela handens tyngd vila på fingret, som har ett stabilt läge med en liten böjning i alla lederna. Prova att dra hela hand/arm bakåt med denna känsla.
Handlederna behöver vara elastiska och följsamma i pianospelet. Tänk en rörelse där armen, handled och fingrar i spelet rör sig framåt-uppåt. Energin kommer från tangenten och ger en lätt, sviktande framåt-uppåtrörelse. Om det blir en låsning i handlederna, så ger det också en ökad spänning i underarmsmusklerna. Se till att handlederna inte hamnar under tangentnivå.
Handens ställning
Undvik att under spelet hålla en ständig sidovridning av handen åt handens yttersida.
Bild 3.5.3: Handryggen ska vara rundad och på insidan är det lillfingret och tummen som ”tänja ut” ”handryggen” och får handknogarna att bli stabila.
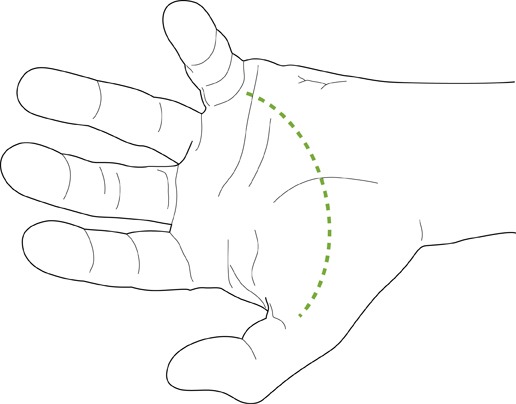

Lägg handen med handryggen upp på bordet och låt underarmen ha stöd på bordsytan. Spänn ut handen med spretande fingrar, så att den blir riktigt bred och det blir långt mellan "fingerknogarna". Böj nu lite lätt i alla fingerknoge-lederna. Nu böjer du extra i tummens ”knog-led” motsvarande fingerknogarna och samt i lillfingret, där själva böjningen görs i ”finger-knogleden”. Låt 2:a till 4:e fingret vara lite mer avslappnade i denna position. Känn att du sträcker och gör hela handen bredare genom att sträcka på diagonalen mellan lillfingret och tummen, så att fingrarna spretar. Håll kvar denna position några sekunder och slappna av. Gör övningen 5-15 gånger och titta på handen från handryggens sida och se hur fingerknogarna kommer fram tydligt.
Handens funktion
Träna kontakten och stabiliteten och tyngdöverföringen till fingrarna på tangenten genom att ”stå” på fingerblomman och långsamt dra fingret mot dig. Detta kan mycket väl tränas på ett bord utan några tangenter. Lägg handen på bordet med handen i viloläge Se Bild 3.5.4.
Handen
Handens utseende
Undersök handens gripförmåga: Låt underarmen vila på bordet och titta på handen. Sök efter en ställning i handen där knogarna är synliga och det känns som om du gömmer en fågel, boll etc. Utgå ifrån den stabilitet i handen som finns runt det 3:e fingret.


Bild 3.5.2: Handen i viloläge med en längsgående båge och en tvärgående båge den optimala utgångspunkten för handfunktionen.
För att få handens fingerknogar i stabilt läge, där de syns tydligt, så träna med hjälp av övningen ”koppen”.
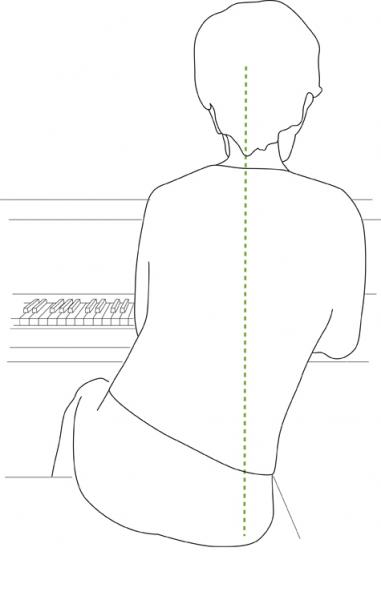
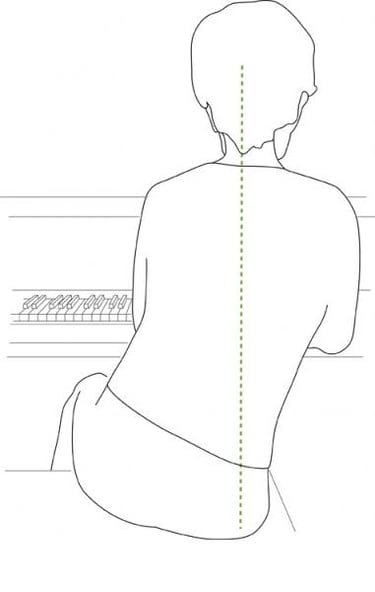
Bild 3.5.1: Tyngdpunkten förskjuts till höger sittbensknöl och överkroppen behåller sitt upprätta läge.
När du kommer långt ner i basen, så förskjuts tyngden till den vänstra sittknölen och vice versa när du spelar långt upp i diskanten. Låt andningen flöda fritt i förhållande till den musikaliska frasen. Håll inte andan när du spelar.
3.5 Ergonomi piano
Kroppens position
Börja med video sittande stabilitet
Sittställningen behöver vara stabil utan att det känns ansträngande i överkroppen/ryggen. Du ska inte behöva känna det som att muskulaturen i överkroppen behöver arbeta, utan bäckenets inställning kommer att vara avgörande för att du kan vila i din sittposition. Hitta en sittställning där du kan komma upp på sittbensknölarna, så att det blir möjligt att vara rörlig kring höftlederna, och att du kan luta dig framåt i olika vinklar för att variera i förhållandet till klaviaturen.
Försök hitta en sitthöjd, så att armbågarna och tangentplanet är i samma höjd. När sittställningen är optimal, så blir det lättare att hitta tyngdöverföringen till fingrarna via armarna. Tänk dig att tyngdöverföringen sker ända nerifrån fotsulorna och via bäckenets kontakt med sittunderlaget och ut till fingerblomman på tangenten. Lås ej fötterna och benen i sittande. Vid pianot ska pedalfoten ha hälen i golvet.
Målet är att använda minsta möjliga kraft och ansträngning i spelet, även i dramatiska höjdpunkter i musiken. När du rör dig längs med klaviaturen, så prova att göra det som en känsla av ”penseldrag” i kroppen. Gör du ett ”penseldrag” upp i diskanten, så prova och upplev tyngdförskjutningen i kroppens ”sittplatta”, som på följande bild.
Titta på handledernas position. Observera speciellt vänster hands 4:e och 5:e fingrars arbetssätt. Om fingrarna är korta så behövs eventuellt anpassning av deras klaffar.
Se till att höger handled kommer i en bekväm ställning, som när du lägger hand/ underarm på bordet i avslappnat läge.
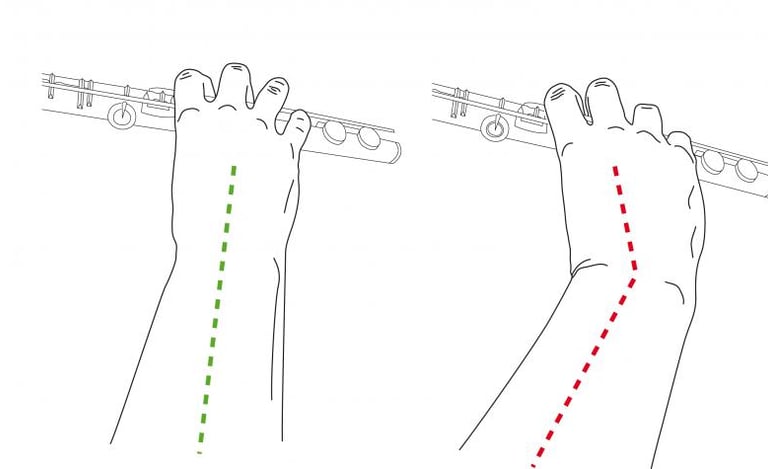
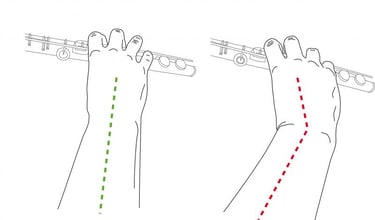
Bild 3.6.4 Vänster bild. Avspänning i handleden och utan sidovinkel i handleden.
Bild 3.6.5 Höger bild. När sista delstycket i flöjten hamnar med klaffarna för mycket bakåtroterade, så blir effekten en kraftigare böjning i handleden. Ibland får man vrida klaffarna för höger handen motsols, för att uppnå detta.
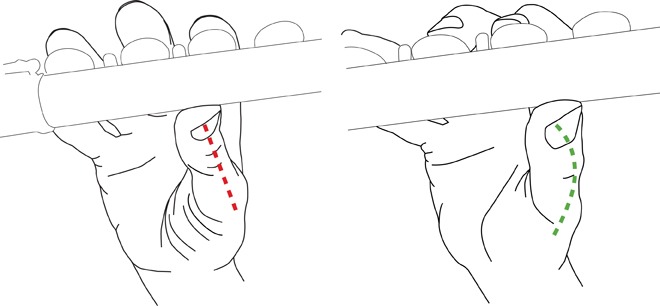
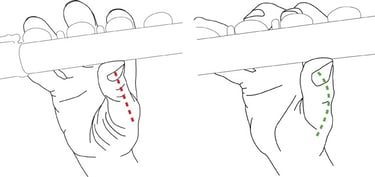
Bild 3.6.2 Vänstra bilden. Vid översträckning i tummens leder, så blir muskelarbetet avsevärt mycket större samt att tumlederna blir mer komprimerade och spända.
Bild 3.6.3. Högra bilden.Tummen placerad närmare motsvarande pekfingret och med avspända leder i tummen.Tummens placering bör vara mer inåt i handen, placerad någonstans mellan pek- och långfinger. Försök få tummen i ett avspänt läge utan översträckning i tummens leder
För att i grunden finna ett stabilt och fritt stående och sittande, så gå till Video Stående stabilitet och video sittande stabilitet. I stående position undviker man rotation i bröstryggraden om man placerar vänster fot framför den högra och får då rotationen nerifrån höfter och bäcken. I sittande så försök ta ut rotationen nere i bäckenet. Det viktigaste är att skuldrorna och skulderbladen har en symmetrisk position. Du kan också få tips om flöjtspel i video flöjt.
Växla i position med flöjten i horisontell ställning och med sidoböjning i nacken, där den horisontella ställningen är mer påfrestande för axlarna och den diagonala mer för nacken med sidoböjningen. Det är bra att kunna variera så att musklerna kan återhämta sig.
Titta i spegeln, så att du inte anstränger nacken extra genom att skjuta fram hakan. Sitter du framför notställ i orkester och också ska ha bra kontakt med dirigent, så rotera stolen, så att det blir bekvämt både på stolen och med blicken, så att du kan växla mellan noter och dirigent, att de båda hamnar i samma blickriktning.
Prova att bära instrumentet med en känsla av att båda händerna belastas lika. Leta efter balansen i bärandet av instrumentet, att flöjten har sina stödjepunkter på vänster pekfingers inre knoge, höger tumme och mot läpparna. Kontakten med underläppen är den tredje stödjepunkten i bärandet av instrumentet. Observera hur kontakten är mellan flöjtmunstycket och läppen. Om trycket blir starkt mot läpparna, så resulterar det i ökad spänning i nackmusklerna för att hålla emot.
Ta ner instrumentet så ofta som möjligt för att komma till viloposition i halsryggraden.
Höger tumme placeras bekvämt med ett läge någonstans vid pekfingret.
3.6 Ergonomi flöjt


Bild 3.7.4 Genom att vända på munstycket, så blir förhållandena i munnen avsevärt mycket mer avspända.
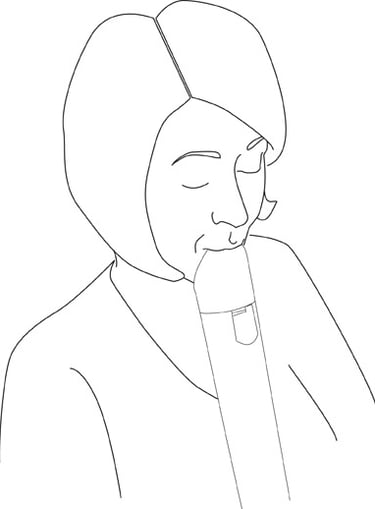

Bild 3.7.3 Det blir väldigt spänt i läppar/mun med detta munstycke
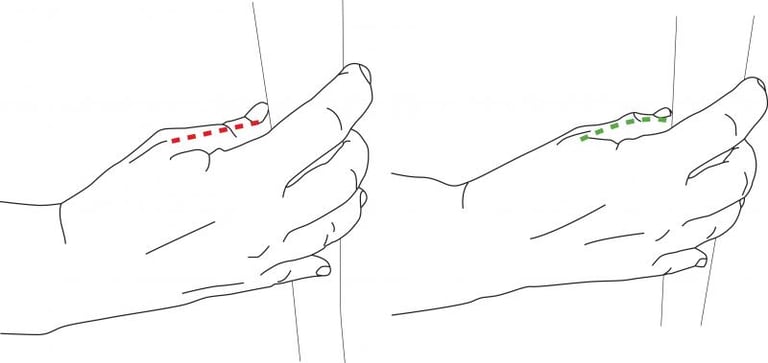
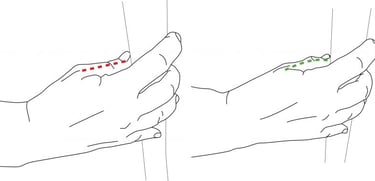
Bild 3.7.1-2 Om tummarnas leder är översträckta, så blir tummen mer spänd och låst i sin mellanled och påverkar anspänningen i handleden.
Med de större instrumenten som basflöjt och kontrabasflöjt, så underlättar det betydligt om det går att avlasta med någon typ av stag mot golvet. Sitter man och avlastar instrumentet genom att stödja mot fötterna och låta instrumentet vila här, så sjunker överkroppen lättare ihop och andningskapaciteten minskar.
Betydelsen av munstycket blir tydligt med denna basflöjt, där munställningen blir mer avspänd när man vänder på munstycket.
3.7 Ergonomi blockflöjter
De olika storlekarna i blockflöjtsfamiljen ger olika belastningar. Det är framförallt höger hand och kontakten med läpparna som stabiliserar instrumentet. För höger hand är tummens placeringen på instrumentets baksida avgörande för belastningen av hand/arm/axel. Att tummen hamnar i ett läge motsvarande mittemot pekfingret brukar göra att spänningen i handen/handleden blir mindre. Om tummen arbetar med översträckning i tumlederna, så ökar det också muskelspänningen runt tummens bas och runt den delen av handleden. Om du vill stärka hand och tumme kan du titta på handövningar- video
Basklarinett
Med basklarinetten, så är det viktigt att nacken på instrumentet anpassas efter personens längd i överkroppen och nacken.
Vänster hand behöver vara flexibel i sin rörelse för de olika klaffarna. Höger hands tumme behöver vara optimalt placerad under bläcket för att undvika överbelastning dvs att belasta så långt in på tummen som det är möjligt. Bra för höger handen att kunna använda avlastning mot golvet eller runt nacken.
Klarinett och oboe
För rörbladsinstrumenten är kvalitén av själva rören betydelsefulla för vilken belastningen blir på läppmuskler och övriga muskler i kinder och hals samt också i övriga kroppens muskler. Ett ”tryck-krävande” rör kan således generera ökade muskelspänningar i hela kroppens muskler.
Om högertummen belastas på ytterfalangen, så kan det vara bra att anpassa belastningsstycket, så att mer av belastning hamnar närmare handen och då också mindre faktisk belastning av musklerna.
Ett alternativ är att avlasta med brett ej avsnörande band runt nacken.
Vinkeln mellan kroppen och instrumentet kan påverka nackens ställning, den ena extremen är om man spelar med framskjutet huvud och den andra att man tittar neråt.
För att skapa goda stå- och sittpositioner som kan avlasta axlar och armar rekommenderas att titta på filmerna om just detta, video stående stabilitet och video sittande stabilitet. Handens stadga och position blir också viktig för att förebygga överbelastningsproblem. Handövningar- video
3.8 Ergonomi klarinett-oboe
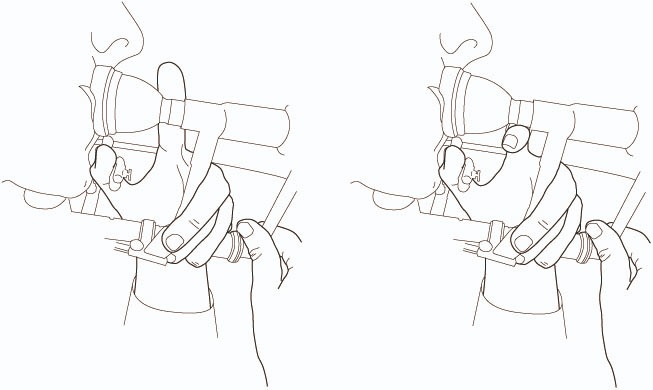
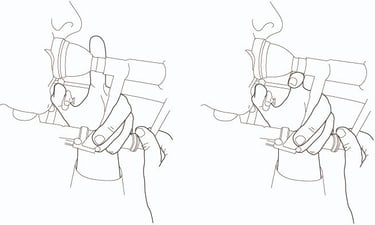
Bild 3.9.1-2. Att hålla instrumentet är ansträngande för hela handen/armen. Det kan bli bättre genom att göra om den lilla kroken, så att pekfingret får en naturligare position.
Balansen i instrumentet blir avgörande för vilken belastningen blir på hand och upp i axeln. Om instrumentet är ”framtungt” så ökar det belastningen på hand/arm/axel mer än om det är tyngre i bakre delen. När instrumentet förs till läpparna och höger hand håller i reglaget, så eftersträva en känsla av symmetri i armarnas position.
Det finns ett finskt avlastande trombone-stick att avlasta instrumentets tyngd med.
video stående stabilitet video sittande stabilitet Handövningar- video
3.9 Ergonomi trombon
Instrumentet hålls av vänster hand och balanseras på ett område på insidan av handflatan på mellanhandsbenen. Det blir avgörande att vinkeln mellan hand och underarm är sådan att tyngden kan fortplantas till armen och vidare till övriga kroppen, att handleden befinner sig i neutralposition. Vänster hand behöver också stabilisera instrumentets benägenhet att rotera. För att undvika överbelastning i vänster arm/skuldra, så är det viktigt att inte hålla instrumentet med ett utspänt handläge och översträckning i pekfingrets ytterled.
Sök efter avspänning i den högra arm/handen och placera sedan handen på instrumentet. Se till att armbågen hålls något utåt, så det blir en känsla av symmetri och att andningsrörelserna inte störs av armarnas placering.
Den vinkel, som instrumentet har i förhållande till kroppen påverkar nacken, och om man inte kan vara i optimal position, då påverkar det också tillgången till den fria andningen.

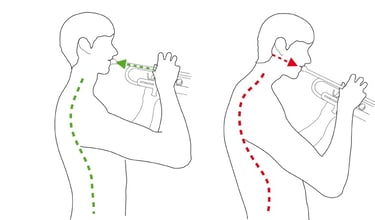
Bild 3.10.3: När hakan drages in och känslan av ett lyft av huvudet bakifrån, så rätas halsryggraden upp till en mer avspänd position. Bild 3.10.4: När det blir en position med tendens av ”gamnacke”, så blir tillklämningen större av diskarna i halsryggraden och belastningen av den stabiliserande muskulaturen som t.ex. ”axel-höjarna” blir stor.
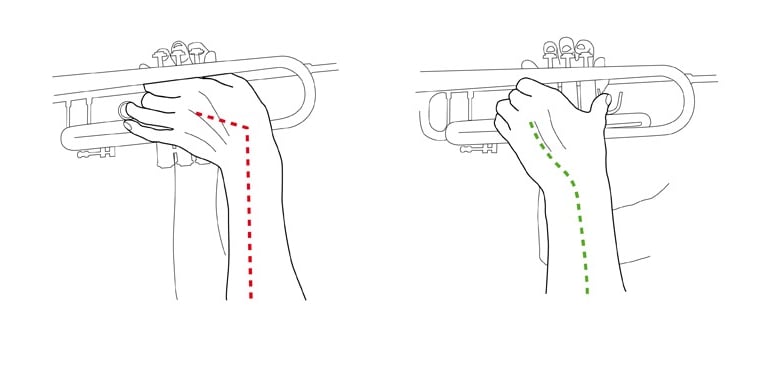
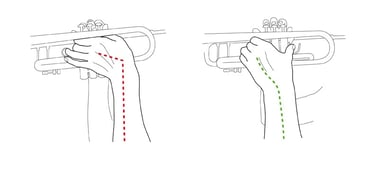
Bild 3.10.1 En sidoböjning i handleden skapar kraftig ökning av spänning i både handled och underarmsmuskler.: Bild 3.10.2: Vid omplacering av tummen, så kommer handrygg/handled i en mer avspänd ställning.
3.10 Ergonomi trumpet
Instrumentet och kroppen
Det första är att komma fram till en avspänd överkropp viktigt för andningen och luftflödet. Alla typer av övningar för att hitta detta är tillåtna, allt från att röra sig med armar och ben för att få igång andningen tillsammans med pulsen till mer stillsamma övningar som vid yoga. Målet är att mellangärdsmuskeln ska få fungera dynamiskt, så att det inte blir motstånd i andningsmuskulaturen. För mer detaljer se i inledning kap 3 för blåsinstrument samt i kapitel 2.
För att andningen ska fungera bra, så behövs en stabil överkropp, där kotpelaren vilar tryggt på bäckenet. För att hitta en stabil bäckeninställning, så prova Video Stående stabilitet och video sittande stabilitet
Det är viktigt med vilket grepp man håller instrumentet. Alla grepp som fordrar en ”utspänd” hand ger lätt extra spänningar, först i hand/underarm och senare kan det även komma i överarm/skuldra. Börja med att hålla instrumentet med vänster hand.
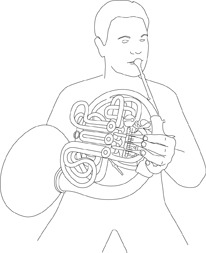
Bild 3.11.2: Ta nu instrumentet till läpparna och då behöver du inte rotera i nacken för att kunna behålla kroppen i samma position i övrigt.
För att undvika huvudvridning, så börja med att hålla armarna med 90 graders böjning i armbågarna och känn på rotationen i överkroppen, att den kommer ända nerifrån bäckenet, en liten vridning åt höger, så att höger armbåge kommer lite bakom kroppen. Huvudet följer med i denna rörelse. Tag nu instrumentet till munnen.
Beroende på storleken på instrumentet så kan det ibland vara lättare att som nybörjare spela stående med instrumentet.
Instrumentet bärs av både vänster och höger arm. Den vänstra handen fungerar bäst med ett handgrepp utan sträckning mellan lång- och lillfinger.
Stabil belastning åstadkommes med tex ”duck foot” eller annat hjälpmedel, som kommer att belasta via utrymmet mellan tumme och pekfinger. Tummens ventilplacering är också avgörande för belastning av hand/arm/axel, så att viloläget är en position för tummen i viloläge dvs en lätt böjning i alla tummens leder. Höger hand placeras inne i klockstycket både för tonpåverkan och för bärande av instrumentet. Instrumentets tyngd kan eventuellt avlastas på höger lår, även om detta blir en statisk position. Viktigt att avståndet upp till läpparna stämmer för att inte nacken ska bli belastad. Ett benstöd alternativt en fast kudde kan fungera som stöd.
Handövningar- video video stående stabilitet video sittande stabilitet
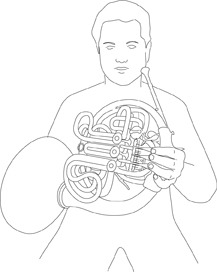

Bild 3.11.1: Inta en position där axlarna är i samma läge och överkroppen är upprätt och ej roterad.
3.11 Ergonomi valthorn
Det finns i princip två olika grundpositioner med hornet:
Att sitta helt symmetriskt med axlarna utan rotation i överkroppen. Då krävs en huvudvridning åt vänster för att det ska passa med munstycket. I denna position kan det fungera att avlasta instrumentet på höger lår. Se till att båda armarna har lite luft mellan sig och överkroppen, så att andningen får fritt utrymme att vidga bålen.
En balanshängare monterad mitt på fagotten kan minska vikten avsevärt.
Det är lättare att balansera instrumentet i stående. I sittande kan en skinnkopp med själva koppen runt nedersta delen (stöveln) av instrumentet och med en rem därifrån och till att kunna sitta på vara en bra avlastning. Även en ”spike” kan fungera som bra avlastning, fast det har oftast en musikalisk negativ effekt. I vår kultur använder alla fagottister en bärrem runt halsen som kan vara mer eller mindre bra utformad med åtstramande effekt för halsen och axlarna. Många finner en dubbel axelrem mest fördelaktig för avlastning och ett bättre alternativ till bärrem än en runt halsen.
För att undvika besvär i käklederna, så prova att spela med känslan av ett litet avstånd mellan tänderna.
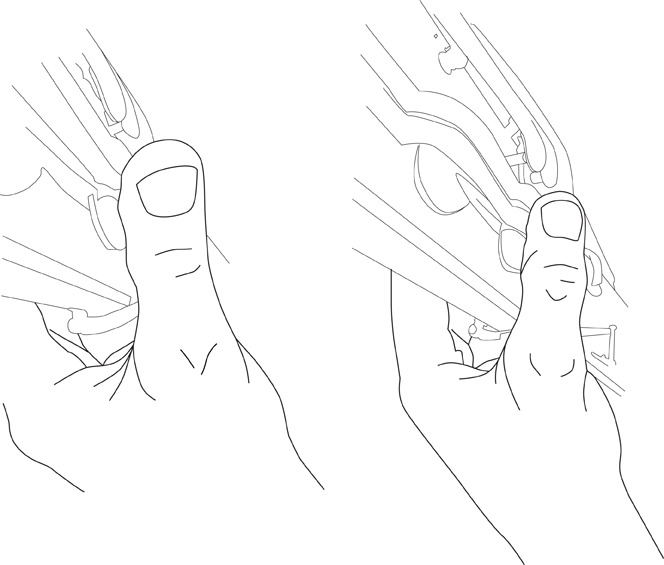
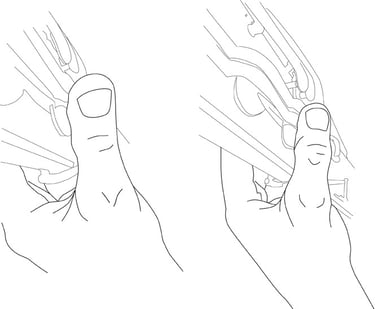
Bild 3.12.2: Tummen hamnar i ett läge med sträckning i tummens mellanled på grund av klaffarnas placering. Bild 3.12.3: Tummen hamnar med en mer skonsam böjning i tummens mellanled.

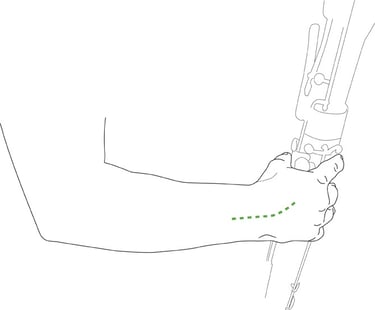
Bild 3.12.1 Bildtext . Höger handled kommer i neutralposition, så att man undviker böjning genom att hålla ut armbågen. Försök behålla en känsla av att hålla något runt som apelsin eller dylikt i handen för en bra handställning.
För att undvika kraftig böjning i handleden, så håll armbågen lätt utåt utan att den blir spänd. Vänster hand håller också runt instrumentet och belastar därför vänster hand.
Höger tumme har flera olika positioner för att hantera de olika klaffarna, vilket kan innebära ökad belastning på tumlederna. Se följande bilder, där viloläget skapas när tummen befinner sig med lätt böjning i sina leder. Vill du göra övningar som stärker din hand och tumme kan du titta på Handövningar
3.12 Ergonomi fagott
För rörbladsinstrumenten är kvaliten av själva rören och kvaliten av instrumentet betydelsefulla för vilken belastningen blir på läppmuskler och övriga muskler i kinder och hals samt i andningsmuskler och i övriga kroppens muskler.
Fagotten är ett instrument där tyngden belastar både höger och vänster hand. Det finns ett inställbart handstöd för höger hand.
Cymbaler
Dessa är ofta tunga och att förlägga tyngdpunkten i kroppens centrum är det som kan avlasta.
Marimba, xylofon och vibrafon
Dessa instrument kräver stor flexiblitet i kroppens tyngdpunkt under spelet. Till en början leta efter en kroppshållning med stabil överkropp se Video Stående stabilitet för ett stabilt stående och en känsla av att ”nu ska jag sätta mig” utan att göra det. Detta för med sig flexibla höftleder och knäleder, så att det går att flytta i sidled utan att behöva flytta fötterna. Alltihop med en känsla av lätt framåtböjning ända nere ifrån höftlederna.
Bild 3.13.3: Avspänd handled och fritt runt själva pukstocken inne i handen.
Bild 3.13.4: Armbågen för handen med pukstocken uppåt.
Bild 3.13.5: Hanleden är nu sträckt och har fört pukstocken uppåt och färdig för att riktas ner och släppas mot pukskinnet.
Stämningen av pukskinet styrs via pedaler och kräver ett rörligt läge och god balans i överkroppen för att minska uttröttning och spänning i vader och lår.

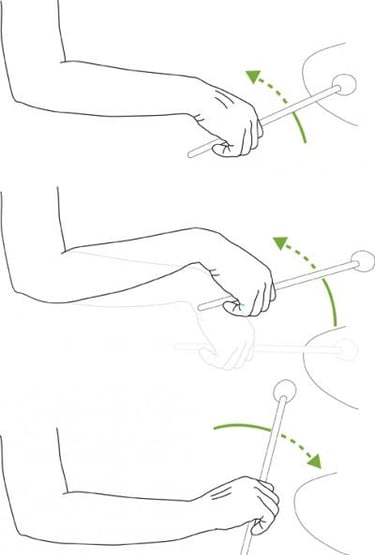
Pukor
Pukstockarna hålles på liknande sätt som trumpinnarna, men med en större lätthet i avslutningen av slaget, så att pukskinnet får klinga.
Prova och låt 1:a slaget av fyra starta i armbågsimpuls och övriga i handleden för att motverka överansträngning av handleds- och underarmsmusklerna.
Vid spel med pedalen till bastrumman, så kan man antingen ha tyngden på hälen vilket ger en större ansträngning på underbensmusklerna på framsidan eller att ha framfoten i kontakt med pedalen och då hamnar mer av rörelsen i lårets muskler.
Bild 3.13.2: Vinkeln i armbågen ska vara 90 grader eller mer. Det ska kännas att armen kan vila i denna position, så att det inte kräver extra kraft att hålla underarm/hand.


Bild 3.13.1: Greppet kring trumstocken med kontakten mellan pekfingrets insida och tummens insida. Underarmen är roterad några grader inåt och med några graders böjning i handleden.
Själva handryggen/underarmen har några graders inåtrotation. Själva rörelsen blir en kombination av handledsböjning och inåtrotation i handleden. Låt impulsen få finnas från de stora musklerna runt överarm/skuldra, för att minska spänningen i armen. Armbågen ska var avspänd. Vinkeln i armbågen bör vara 90 grader eller mer för att hitta en så avspänd känsla som möjligt, så att man undviker känslan av att behöva hålla underamen och handen "uppe".
Börja med video sittande stabilitet för att finna en stabil överkropp och att kunna balansera på de två sittknölarna.
När det gäller instrument som marimba, xylofon och vibrafon, så är det fötterna som är”basen” i fundamentet. Var god se Video Stående stabilitet
Vilopunkten och utgångspunkten för handledsrörelsen behöver vara i neutralläge dvs att handleden/handen inte är vinklad åt någotdera sidoläget eller med böjning i handleden.
Trummor
I greppet av trumstockarna, så är det ett match grip mellan tumme och pekfinger och med ett stöd av övriga fingrar, vilka bildar en kanal och ger ett flexibelt grepp. Trumpinnen har kontakt med tummens fingerblomma och med insidan av pekfingrets yttersta led.
3.13 Ergonomi slagverk
3.14 Ergonomi orgel
Sitta vid orgeln
Som organist krävs en stabilitet i överkroppen utan att kunna ha stöd för fötterna mer än kortare stunder. Då är det viktigt att sitta med ett stöd under en del av låren. Träna på att hitta en stabilitet i själva sittande enligt video sittande stabilitet. Både bukmuskler och ryggsträckarna behöver vara starka och uthålliga, för att stabilisera bäckenet och bålen i sittandet utan att kunna ha stöd av fötterna hela tiden.
För att kontaktpunkterna med fötter och pedal ska hamna på främre-inre delen av fötterna, så hålls knäna ihop, och då behöver det finnas en lätt inåtrotation i höfterna. På vissa orglar måste man hålla lårbenen mer parallella, så att man spelar med främre delen av fötterna.
Det mesta av rörelserna hamnar i fötter och underben i pedalspelet. Vid pedalspel på vänster sida, så hamnar tyngdpunkten på höger ”skinka” och vice versa. Under pedalspelet så är det viktigt att kunna sitta på samma punkt men kunna ändra på tyngdpunkten.
Handen
Var god se 3.5 Ergonomi piano och de olika filmerna om Handövningar- video

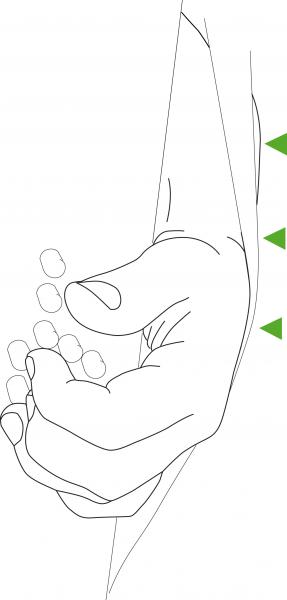
Att stå och spela är mer belastande för axlar och rygg, men annars gäller samma som ovanstående. För ett stabilt stående Video Stående stabilitet .
Bild 3.15.3: Trycket ligger mellan remmen och handleden, när bälgen dras ut.
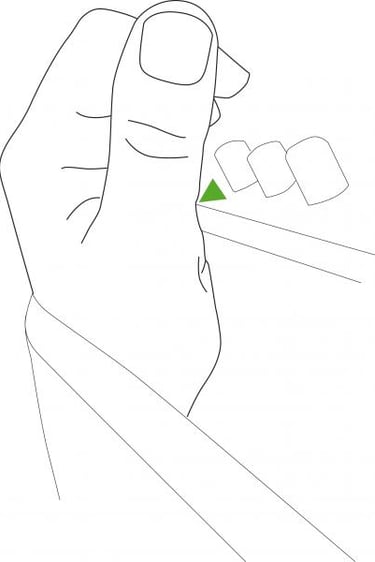

Bild 3.15.2: För vänster hand är det viktigt i spelet att tummen har stöd.
Bäljen dras ut med vänster handled mot själva basremmen. När man ska göra ”bäljskakning”, så kommer impulsen från överarmen.
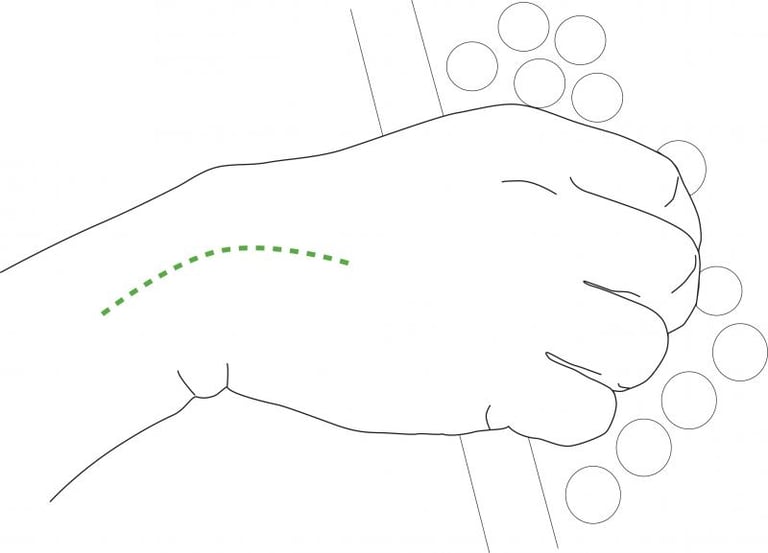
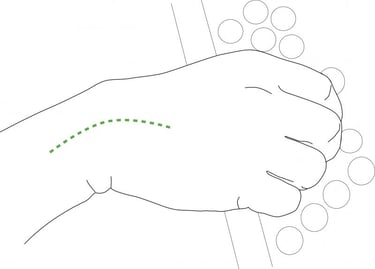
Bild 3.15.1: Alla fingerknogarna syns och handleden har en tendens till inåtböjning.
Prova att lägga händerna över bollar eller över dina knän, för att få ett bra handgrepp som utgångspunkt i spelet. Höger tummen behöver vara fri och självständig för att kunna användas som övriga fingrar i spelet. Själva handleden kommer här att leda impulsen.
För vänster hand kommer tummens grundled i kontakt med instrumentets kant, för att ge stabilitet i knappspelet.
3.15 Ergonomi accordeon
Börja med att titta på video sittande stabilitet. Prova att sitta med balans på båda sittknölarna och god fotkontakt med golvet, avspänd i båda axlarna med en känsla av att båda axlarna hänger skönt. Trä på axelremmarna över axlarna, så att instrumentet kommer att hamna i nära kontakt med kroppen. Låt axlarna fortsätta och hänga och överarmen vara avspänd, så att armbågen också kommer att vara hängande. Placera instrumentet, så att instrumentets tyngdcentrum stämmer med kroppens centrum dvs att hela instrumentet kommer att hamna lite mer på vänster sida av kroppen. Höger handled kommer att befinna sig i en tendens till inåtböjning, för att lätt kunna förflytta handen längs med tangenterna.
Sittställning utan instrument
Börja med att använda en stol som har plan sits. För att kunna balansera instrumentet behövs en sittställning med låren i 90 graders vinkel i höften, för att instrumentet inte ska ha tendens till att glida iväg. Lägg något trögt material på låren, för att motverka instrumentets glidning. Axlarnas ställning behöver vara symmetriskt placerade och i avspänt läge med stabila skulderstabiliserare, så att inte någon av axlarna dras framåt. Gå till övningen för video sittande stabilitet
Sittställning med instrument
Ta nu instrumentet och när du lyfter det från golvet, så försök lyfta det med hjälp av lårmuskler och bukmuskler, för att minska belastningen av axlarna. Känn på var instrumentets tyngdcentrum finns och försök att balansera det utan att ta i med armarna mer än absolut nödvändigt. I spelet med ventilerna går det att använda fingertopparna, när det är snabbare löpningar, men annars får handleden en bättre ställning om klaffen hamnar i höjd med yttersta fingerleden.